The Putter Refinishing Thread

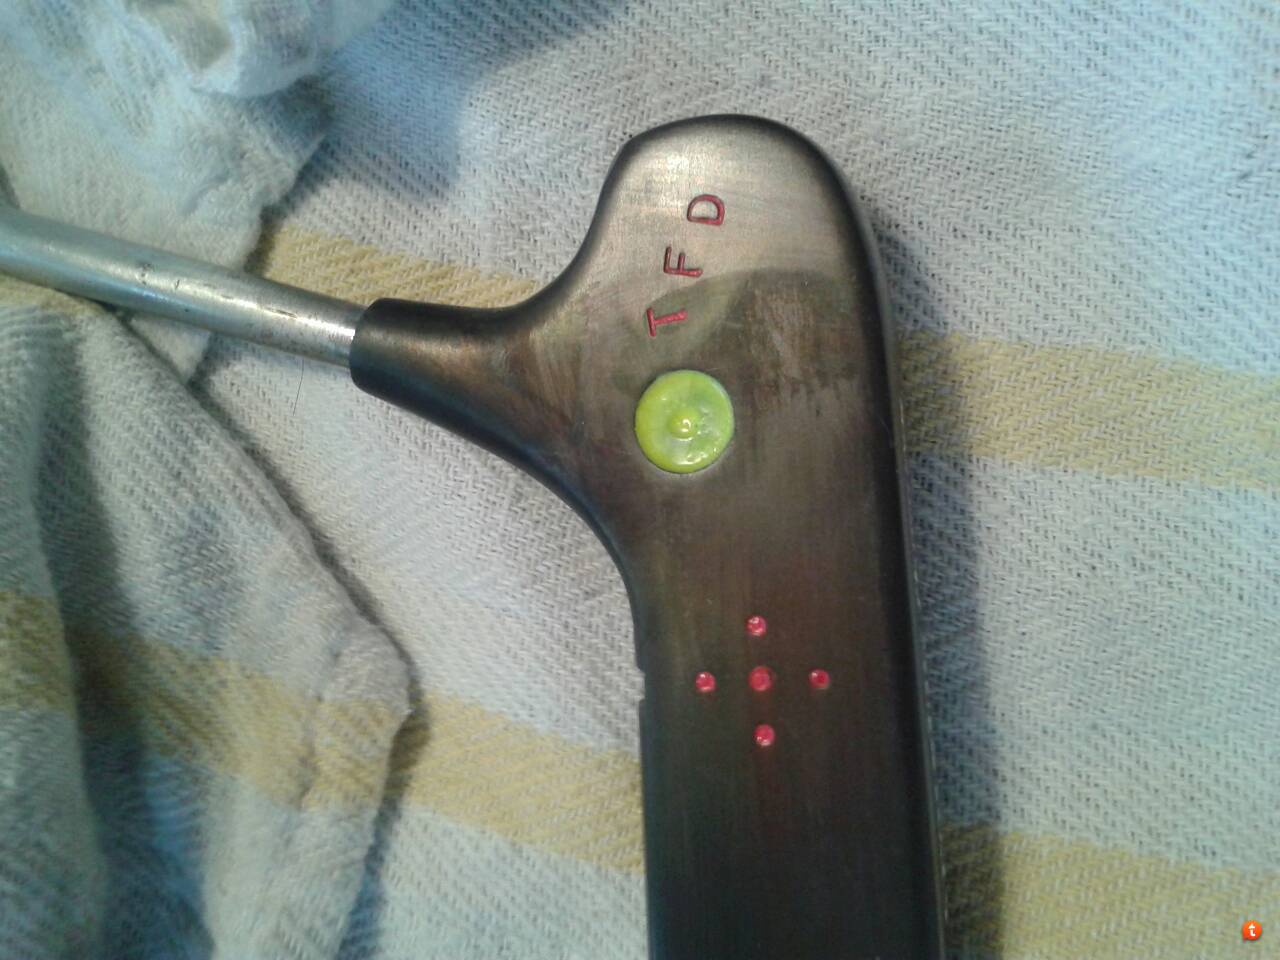
My newly acquired Ping B60 is going to be my new gamer... so, I trimmed it to 33" and it got a new Black Widow grip last night.... and is undergoing some refinishing. The blade will get some paint and decor to match the grip.

1468801_10151860915633401_1953929689_n.jpg


1472900_10151860915638401_466241597_n.jpg
1476270_10151860915648401_166737599_n.jpg
 
Hoosier Golfer, do you refinish putters for people that arent members at your club?

have a Cameron that I would like cleaned up. I can do all the paintfill.
 
After extensive sanding to remove all nics and scratches, I gave my Ping B60 a light coat of primer, including the hosel, (except the face) in preparation for final coats of platinum airbrushing. So far.... so good.

BZ9brODCAAA5XpT.jpg:large
 
Dave that's gonna look sweet when you're done. Nice job so far.
 
That Ping B-60 is gorgeous. Nice work!
 
Hey guys I recently bought a putter that I would like to refinish. I was wondering if there was an easy way to strip the finish or is sanding the only option. I bought it off eBay so don't really know what the finish is so any help on this project would be awesome.
pepy8y7e.jpg

uqa6eby9.jpg

y8e3a3u9.jpg


Sent from my iPhone using Tapatalk
 
Hey guys I recently bought a putter that I would like to refinish. I was wondering if there was an easy way to strip the finish or is sanding the only option. I bought it off eBay so don't really know what the finish is so any help on this project would be awesome.
Sent from my iPhone using Tapatalk

If you mean starting with the paint fill, you can remove that with finger nail polish remover. Use coarse through fine sand paper to remove dents, nics and scratches.
 
Last edited:
I'm just not sure if it's chrome plated and if it is, is there any safe, easier way to remove it than just sanding it


Sent from my iPhone using Tapatalk
 
Also, for anyone interested in trying it, the best project putters around IMO are the old Spalding TPM Mills putters, usually they can be found pretty easily and cheaply as well.

Thread resurrection. Been looking at a few today on eBay. If the weather cooperates tomorrow I am going to hit Goodwill and see if I can scrounge up a couple for cheap. This is going to be my winter project. A nice polish and then a custom paint fill ... should be fun. And I can hand them out as gifts!


Sent from my iPad using Tapatalk

They clean up really nicely, and better yet, they are actually really solid putters.
 
They clean up really nicely, and better yet, they are actually really solid putters.
Yeah, have seen a lot of refinished ones and they look very sharp. Was going to try my hand at simply getting one to a nice polished finish, work out a nice paint fill scheme, and do some stamping to customize it. Figured as a first go that was enough. Eventually would like to gun blue, and oil can.

Forgot I had what I think is an old aluminum no name putter in my shed. It's got a black coating which I should be able to strip easily enough. Probably just strip the current paint job, polish it up, and stamp it. Could always take it in for a powder coat.

Note to self: Antique stores always overprice everything. Look elsewhere for old putters to be had for cheap.
 
Last edited:
Found my victim. It's a Spalding "Personal Model". Couldn't believe how hard it was to locate a putter. The Goodwill and Salvation Army stores had plenty of irons and woods, but no putters, and all the antique stores were pricing putters like they were Scotty Cameron's (and they weren't). Anyways, found this junker and got it for $2. I think it's aluminum because while I can get a magnet to stick to the shaft, it won't stick to the blade itself. The shaft will need to be replaced, as does the grip which I think a dog used as a chew toy. Will post a "before" picture when I get home. Going to start sanding tonight, as well as purchase all my tools (stamps, 3# hammer).

Once I get it polished up, I'll decide if I want to keep it like that, paint, or use something like aluminum black (leaning this direction). Then for a paint-fill color scheme.

Edited to add: Got most of it sanded tonight. Started with 60 grit, and moved up to 120. Did it by hand, which stinks and took a couple hours. Going to pull out a power sander tonight to wrap it up. Also need the Dremel tool to get the top and around the hosel. Didn't realize this putter uses an old pencil tip shaft and it's almost impossible to find ferrule's for it. The ferrule is damaged a bit, but I've decided to not pull the shaft. There was a lot of rust on the shaft but I sanded it off. Let with some pitting, but I think I am going to pull/cut/scrape off what is left of the grip, sand the entire shaft down, and probably prime it, paint it black, and clear coat it.

Also need to grab a forstner drill bit ... this will be a putter unlike any other.
 
Last edited:
Having a heck of a time sanding around the neck of the putter. This chrome plating was made to last! Need to get a sanding kit for my dremel and will knock that out tomorrow. For the most part, I think it looks good. Went through a 60 grit sand, then a 120, and finished with a 400 grit. Once I get the neck done, and get the stamping done, I'll go over it all with 0000 wool. Though I may take one more shot at the last few nicks that survived the first rounds of sanding. Need to find aluminum black, because I want a dark finish and then just need to decide what color paint fill I want. Debating either a sky blue, or a deep red. Could be talked into an ivory or somesuch ... or any other color scheme I haven't thought of that would be cool. Here are my current "Before" and "After" pics ... you can see just how thrown around this club was. Poor thing.

Before
1014379_692542734101964_558708014_n.jpg


After
1014379_692542730768631_2106418203_n.jpg
 
Well done!
 
Very nice
 
The Putter Refinishing Thread

Thanks. Let me tell you, by the time I bought the steel stamps, drill bits, files, and dremel parts ... let's just say this better become a lasting hobby of mine! Still have to buy the paint for the paint fill, spray paint for the shaft, and find a grip that will fit this pencil shaft.


Sent from my iPad using Tapatalk
 
I'm working up the courage to start refinishing my M3.

Is there any reason for not stopping after you sand and buff the hell out of the putter instead of continuing on with the heat/oil/paint?
 
I'm working up the courage to start refinishing my M3.

Is there any reason for not stopping after you sand and buff the hell out of the putter instead of continuing on with the heat/oil/paint?

I would definitely recommend finding an old putter to test first. I made a couple dumb mistakes in this one and would bummed if it were my gamer or a fave of mine. This one cost me a couple bucks so nothing invested but my time and supplies.

Some like the polished look so don't bother with a finish. I like a darker look, so will go with a gun black kit.

Next post will be my stamping. If you look to the left of the "T" you can see my first stamp attempt. Too deep to sand out. Glad this wasn't on a good putter.
 
First stamp attempt. Added initials and bullseye in center of blade. uploadfromtaptalk1391303524568.jpg
 
Note to self: better off using drill press with Forstner bits. Also, probably better off going with a small metal bar and loc-tite next time, as opposed to the screw method for the ball marker. I figure it is a prototype, so I was bound to make mistakes. Also, aluminum black didnt work as well as I would have liked. May have to sand it down and try again. Ugh. Lessons learned ... avoid aluminum. I think things would have worked out better if I had found a steel putter. The inclusion of the ball marker on the back was a last second decision, The screw in the back doesn't get the marker to sit properly in the base that was drilled out with a 1" forstner bit. I may be able to adjust that by pulling out the screw and placing a washer underneath it before reattaching the screw. Going to work with it a bit.

Currently in the middle of a paint fill. When it's all done, I'm going to use gun oil to see if it darkens the finish. If I don't like the way it turned out, I'm going to strip it all out, sand it down again, and try using the aluminum black one more time. Read one method of simply soaking the thing constantly for awhile and not stopping the reaction with water. Supposedly gives you a darker finish. Also need to avoid using paper towels as it seems to mar the finish.

Additional Notes: Using fluorescent paint in the drilled out portion on the face of the putter. Fluorescent paint is extremely runny. Modelers suggest a base white coat, allowed to dry a couple of days before laying down one of several coats of the fluorescent paint. Bleh. Patience is not a virtue of mine.

Strongly leaning towards re-sanding this puppy down and starting from scratch. Also thinking about going to a jewelry store and buying stainless steal 1 inch circular blanks and using loc-tite to secure it inside the hole I drilled in the back. Only problem with this is, it won't be easy to get the ball marker out of the hole then. May have to cut the blank such that I can press the bottom of the marker to flip the top up so it can be grabbed (like they do with the ball marker challenge coins).

y7yhyrun.jpg


4y5a2agu.jpg


sudu4use.jpg
 
Last edited:
Letting the aluminum black cure overnight definitely helped with the finish. Got the first round of paintfill in. Looks ok!

Now time to do touchups.

agy8e2y7.jpg


y2esugy7.jpg


yraga8yn.jpg
 
Last edited:
I rescued a beat up FGP off the bay and have begun the process of bringing it back to life. I'm thinking either leaving it stainless or blackening it with Caswells. I will put up some pictures eventually. Sanding the cavity is quite the challenge
 
I rescued a beat up FGP off the bay and have begun the process of bringing it back to life. I'm thinking either leaving it stainless or blackening it with Caswells. I will put up some pictures eventually. Sanding the cavity is quite the challenge
Do you really need to sand the cavity, or just strip the paint off? You could go to a Hobby Lobby ... they have a multitude of sanding utensils/instruments, which will be good for polishing. IIRC, the FGP is stainless steel, so there are a number of ways you can finish it. You could torch it, or oil can finish it as well. Would love to see pictures of the completed project. I need to regrip the putter I was refinishing, but otherwise it's pretty much done. Not the prettiest refinish in the world, but for a first go it wasn't too bad.
 
Do you really need to sand the cavity, or just strip the paint off? You could go to a Hobby Lobby ... they have a multitude of sanding utensils/instruments, which will be good for polishing. IIRC, the FGP is stainless steel, so there are a number of ways you can finish it. You could torch it, or oil can finish it as well. Would love to see pictures of the completed project. I need to regrip the putter I was refinishing, but otherwise it's pretty much done. Not the prettiest refinish in the world, but for a first go it wasn't too bad.

I'm stripping the platinum finish to bring it down to bare stainless steel for now, and may blacken it with Caswell's stainless steel blackener gel.

I've been able to get most of it off with 60 & 100 grit sandpaper so far. I plan on continuing to sand everything by hand (except the face) with 220, 400, 600, 1200 grit paper. I may give a quick block polish to the face with 1200 because it's nicked up a bit.

I will need to re-shaft as well (thinking vibrant flat black) and throw a super stroke 3.0 on it. It's probably going to take a couple of weeks but I've got snow to melt and time to kill. Here's how it looks today:
ary8y8yb.jpg
aqyta2y5.jpg
rugahy9u.jpg
 
Back
Top