


- Admin
- #1
I get a lot of questions about removing, changing and altering paint fill in clubs, so I thought I would start a thread. I will be doing some paint fill changes to some clubs coming up soon, but wanted to first show exactly what I use for my paint fill projects.
People always ask what type of paint to buy. While some use different methods like crayons and other tools, I prefer to use an enamel paint. I think the look is more professional and the durability is great. There are a lot of brands out there, but the one I seem to go with more than not is the brand called Testors. They are available at most hobby shops or craft stores and have a TON of colors.

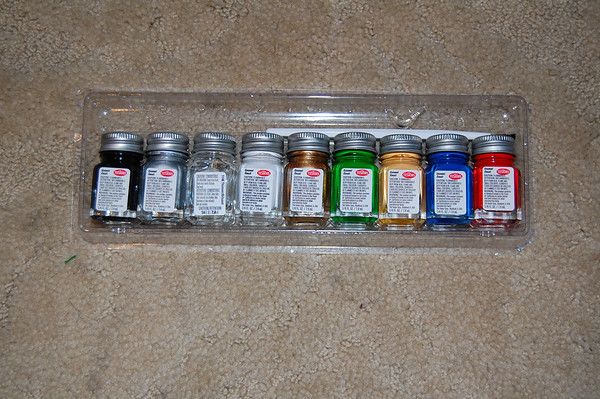
Here is a kit that I recently picked up that would make a good starter kit for people. The cost is about $10 and you get everything you would need.
8 Paints - Yellow, Gold, Red, Blue, Green, Silver, Black, White
Thinner - 1 bottle
Brush - A small thin brush
Between the colors here and the mixing and matching you can do, you could be set for good and like I said previously, the paint holds up really well.
Some use a brush, others use a toothpick, and even more use other items to work with. I use a combination of things. The first thing that I have really fallen for, for these projects is a Paint Fill Bottle. You can pick them up online at stores such as Golf Works. Why do I like it? Because they are inexpensive at about $2 and dispense paint through a fine tipped needle. Paint is not included, but once you mix your color of choice, the filling part is a breeze and really makes it easy to get into those smaller engraved areas.

Next up is the paint fill removal. I will get into the tools I use and other options as well as how to do it, coming up in the next post.
People always ask what type of paint to buy. While some use different methods like crayons and other tools, I prefer to use an enamel paint. I think the look is more professional and the durability is great. There are a lot of brands out there, but the one I seem to go with more than not is the brand called Testors. They are available at most hobby shops or craft stores and have a TON of colors.
Here is a kit that I recently picked up that would make a good starter kit for people. The cost is about $10 and you get everything you would need.
8 Paints - Yellow, Gold, Red, Blue, Green, Silver, Black, White
Thinner - 1 bottle
Brush - A small thin brush
Between the colors here and the mixing and matching you can do, you could be set for good and like I said previously, the paint holds up really well.
Some use a brush, others use a toothpick, and even more use other items to work with. I use a combination of things. The first thing that I have really fallen for, for these projects is a Paint Fill Bottle. You can pick them up online at stores such as Golf Works. Why do I like it? Because they are inexpensive at about $2 and dispense paint through a fine tipped needle. Paint is not included, but once you mix your color of choice, the filling part is a breeze and really makes it easy to get into those smaller engraved areas.
Next up is the paint fill removal. I will get into the tools I use and other options as well as how to do it, coming up in the next post.

")
