We've launched the new forums! Read more here
Navigation
Install the app
How to install the app on iOS
Follow along with the video below to see how to install our site as a web app on your home screen.

Note: This feature currently requires accessing the site using the built-in Safari browser.
More options
You are using an out of date browser. It may not display this or other websites correctly.
You should upgrade or use an alternative browser.
You should upgrade or use an alternative browser.
My backyard putting green project
You are using an out of date browser. It may not display this or other websites correctly.
You should upgrade or use an alternative browser.
You should upgrade or use an alternative browser.
- Joined
- Sep 11, 2013
- Messages
- 74,680
- Reaction score
- 88,154
- Location
- Ponte Vedra, Florida
- Handicap
- 11.9
Man this has been a fun read! Tons of work & looks fantastic. That will be one heck of a back yard when finished!
Looking great. Lots of effort put in here. I love projects like this, mostly when they are complete. 
That is amazing progress! Looks fantastic next to the pool.DG (Decomposed Granite) day.
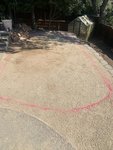
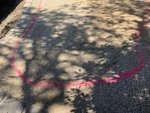
I rented a compactor for $40/day. Then spent a couple hours compacting the road base. Then I moved 2 1/2 yards of DG. Spread and ompacted the DG as I watered it in for another couple hours. Then soaked it all. Tomorrow I’m going to start to add DG to make a small mound for break. I painted some pink lines to simulate where I think I’ll put the fringe.View attachment 8958223View attachment 8958224View attachment 8958225View attachment 8958226
Just read through this and rhat looks awesome
Very impressive. A lot more work than my project which took me two weeks by myself. SO, I can really appreciate what you have done. It's going to be beautiful after the putting turf gets put it in.
Dude_Abiding
Well-known member
Want to come do my house now? Since you built one already, you should fly through mine.
All seriousness: this is F***ING AWESOME.
All seriousness: this is F***ING AWESOME.
- Joined
- Mar 17, 2018
- Messages
- 20,098
- Reaction score
- 28,340
- Handicap
- 18.0
This is going to look amazing. The whole back yard
Otisdakilla
Active member
- Joined
- Aug 8, 2020
- Messages
- 29
- Reaction score
- 114
- Thread starter
- #59
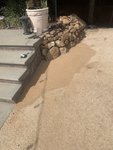
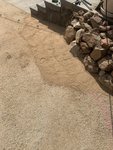
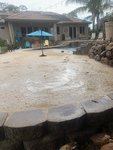
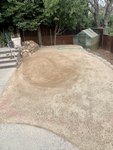
A well needed slow day yesterday. I just wet the surface a lot and added about 2 wheelbarrows of DG to make a small mound. I have no idea what I’m doing. I’m just trying to make a subtle break(s). I used a hand tamper to pack the mound. Soaked it well too. Going to continue to water the area and sculpt the mound over the next few days as I wait for the guy to show up to help me install the turf. I’ll keep u all posted and I’m going to compile a cost list to see just how much this cost me. I’ve lost track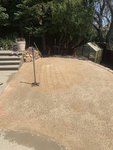


- Joined
- Aug 30, 2018
- Messages
- 26,546
- Reaction score
- 22,291
- Location
- Yukon Territory, Canada
- Handicap
- 9.2
That is going to be one heck of a backyard! Good call on adding some breaks with DG.A well needed slow day yesterday. I just wet the surface a lot and added about 2 wheelbarrows of DG to make a small mound. I have no idea what I’m doing. I’m just trying to make a subtle break(s). I used a hand tamper to pack the mound. Soaked it well too. Going to continue to water the area and sculpt the mound over the next few days as I wait for the guy to show up to help me install the turf. I’ll keep u all posted and I’m going to compile a cost list to see just how much this cost me. I’ve lost trackView attachment 8958469View attachment 8958470View attachment 8958471View attachment 8958472View attachment 8958473View attachment 8958474
Otisdakilla
Active member
- Joined
- Aug 8, 2020
- Messages
- 29
- Reaction score
- 114
- Thread starter
- #61
Now you’ve got me contemplating ripping my lawn out and making something like this.Thanks. BTW I chose my turf. View attachment 8958482
- Joined
- Sep 11, 2013
- Messages
- 74,680
- Reaction score
- 88,154
- Location
- Ponte Vedra, Florida
- Handicap
- 11.9
This is going to look amazing!
You and me both!! I've already said something to the Wife about it. She didn't shoot me down so I'm holding out hope.Now you’ve got me contemplating ripping my lawn out and making something like this.
This is a great follow for sure. You are really putting in the work. Very impressive.
This is super legit. What percentage in cost do you think you saved by doing most of it yourself?
Means we don’t have to water or pay the Gardner. Sounds like a bargain to me.You and me both!! I've already said something to the Wife about it. She didn't shoot me down so I'm holding out hope.
This is a great follow for sure. You are really putting in the work. Very impressive.
DG_1234
Well-known member
- Joined
- Nov 29, 2015
- Messages
- 6,211
- Reaction score
- 1,931
- Handicap
- 2
Great thread here , thanks. Impressive work done by the OP for sure.
On a (somewhat) related subject I happened to be in a major chain golf retailer store when the shop's putting green was being redone. So, I saw the work of preparing the surface before laying down the synthetic turf finish layer, including funnels to the various holes of the green. And that is how you sell putters. No lie.
On a (somewhat) related subject I happened to be in a major chain golf retailer store when the shop's putting green was being redone. So, I saw the work of preparing the surface before laying down the synthetic turf finish layer, including funnels to the various holes of the green. And that is how you sell putters. No lie.
Dude, post some pictures of your project. Sounds amazing!Although we had our green professionally installed, the prep of the area as to tree, shrub, root removal was all on us.
Obviously, the foundation is paramount and the foundation actually begins UNDER the soon to be applied stone.
Our company, supported by my own research, stated that it was hugely important to remove as many roots within the entire intended surface as possible.
It would take a while but if many are not removed, they will eventually decay and as you may imagine, compromise the integrity of the sub-base as there will be a lot of weight applied above. The residual affect would be eventual deformation upon the green's surface.
We already had an electric SunJoe tiller so I used that to expose as much as I reasonably could. Because my project space was within the edge of (formerly) light woods, there were LOTS of roots once removed.
Two years later, in the exact area I'd have suspected, I'm now addressing very minor sagging.
I couldn't get any heavy(ish) equipment back there and I just couldn't get all roots by hand in that one more dense spot. Forget hours... days into a couple of weeks just hacking away in that one area.
Keep in mind, our build had tons upon tons of stone and crushed stone applied. 22 tons to be exact!So the downward force is incredible.
Ours is not yet an issue. Every couple of months, usually more just to keep it running fast, I run the 300 lb lawn roller over the entire green in multiple directions, and we're good.
Just different from new as the slowly formed slight depression is what it is. Doesn't negatively affect putting, actually adds some new and appreciated break. I prefer how it is now, actually. But who knows what the future holds?
My long winded rant is to say, prep the *helloutta* the space and remove as many roots, big and small, as you possibly can.
Best of luck, cool/great project!
This is coming together nicely! You get every arm you can find and have it pat yourself on the back. Can't wait to see the finished product!!
Dang that is coming along nice!
Otisdakilla
Active member
- Joined
- Aug 8, 2020
- Messages
- 29
- Reaction score
- 114
- Thread starter
- #74
Thanks for the support guys. I sculpted the mound more this afternoon. I think I’ve got it about where I want it. I decided on the dark olive over the emerald for the putting surface. Just personal preference. As far as price, I had one bid for $10,200 and that was after I cleared out the Rosemary brush, roots and hauled it away. So, that would have been another $1,500. My turf installer just texted. He and I are going to lay down the turf Wednesday morning!!!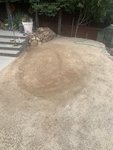





 So the downward force is incredible.