Six4three5
Tour Star...Layin' Up!
BF the pink looks fantastic and that 915 looks so clean.
Follow along with the video below to see how to install our site as a web app on your home screen.

Note: This feature currently requires accessing the site using the built-in Safari browser.


Stock photo of the 915H
Tough to tell but I even painted the inter circle of the weight pink too.
Oh man! that's awesome! How hard was that to paint the gray crown looking thing and the little ring? Did you take out the weight to paint it?
Actually it was a lot easier than I expected lol. I did take the weight out and was just really careful while painting the silver and let it dry for a while and it came out really well!
That was the hardest part because the ring stays inside the weight.does the ring come out or is it part of the weight that's in there for good?
That was the hardest part because the ring stays inside the weight.
Thanks dude!!ah shucks. I'll just keep mine black. I don't have the steady hands to paint something that small. Your's look great though! I'd bet it stands out.
Thanks dude!!
I get a lot of questions about removing, changing and altering paint fill in clubs, so I thought I would start a thread. I will be doing some paint fill changes to some clubs coming up soon, but wanted to first show exactly what I use for my paint fill projects.
People always ask what type of paint to buy. While some use different methods like crayons and other tools, I prefer to use an enamel paint. I think the look is more professional and the durability is great. There are a lot of brands out there, but the one I seem to go with more than not is the brand called Testors. They are available at most hobby shops or craft stores and have a TON of colors.

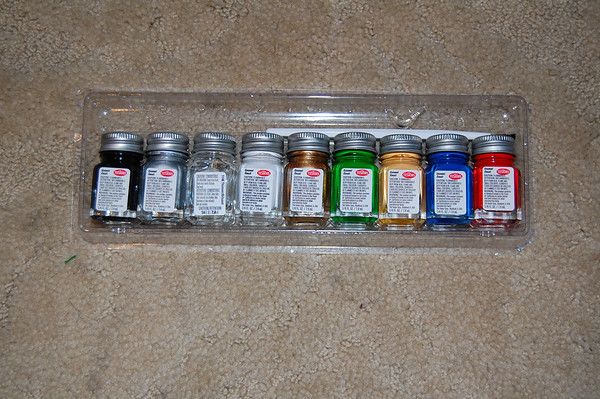
Here is a kit that I recently picked up that would make a good starter kit for people. The cost is about $10 and you get everything you would need.
8 Paints - Yellow, Gold, Red, Blue, Green, Silver, Black, White
Thinner - 1 bottle
Brush - A small thin brush
Between the colors here and the mixing and matching you can do, you could be set for good and like I said previously, the paint holds up really well.
Some use a brush, others use a toothpick, and even more use other items to work with. I use a combination of things. The first thing that I have really fallen for, for these projects is a Paint Fill Bottle. You can pick them up online at stores such as Golf Works. Why do I like it? Because they are inexpensive at about $2 and dispense paint through a fine tipped needle. Paint is not included, but once you mix your color of choice, the filling part is a breeze and really makes it easy to get into those smaller engraved areas.

Next up is the paint fill removal. I will get into the tools I use and other options as well as how to do it, coming up in the next post.
I'll tell you what though, the paint pens could not have been easier to work with.Looks awesome!!


View attachment 18823
View attachment 18824
View attachment 18825
stripped sanded and polished custom painted the bottom of my ghost tour daytona 12
I have an old FGP where the black oxide is chipped. How do I remove it all so I can repaint the head or powder coat or whatever?
Go back in the thread and look for the post by Vegan where he redid the paint job on his R1 (?) driver. I think he discussed how to remove all of the factory paint, etc.
It appears he just paints over the old...Thanks but couldn't find where he mentioned what he used to strip the powdercoat. I did pick up a can of Klean strip which I saw automotive guys use on powdercoated parts.
I used the Tamiya in the smaller can 100ml, says for plastics on the can, but can be used on most things without an issue. Only prep work was taping off the areas I didn't want painted.
that it wasThese photos, plus the Sleeman? Looks like a fantastic weekend project combination to me hahaha! Nice!
wasn't that bad once i got going i would say about 3 hours in total of sanding and that was the hardest part of doing this the paint almost turned gummy when i got going fast with the sand paperBet that was one hell of a project.


