Pulling a shaft tip without a shaft puller?

JW Smoove

Waffles, always waffles
Albatross 2024 Club
Joined
Feb 17, 2021
Messages
11,680
Reaction score
12,512
Location
Charleston
Handicap
🧇
I used to have a vice mounted shaft puller. I no longer do, I've been out of the tinkering business for a while.

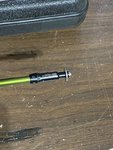
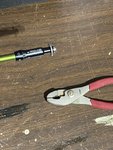
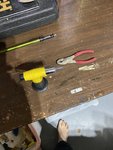
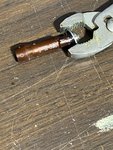
Now I have a shaft that I'd like to pull the tip on. Can I mount the shaft in a vice with a grip style rubber piece, and have a second person pulling on the tip with a pliers as I apply heat to the tip?. Would that work?

Other thoughts or ideas appreciated.

Thanks
 
Work, yes just biggest concern is to pull it straight off. Using a screw and washer will help avoid marking up the adapter.
 
I'm not worried about the adapter, I want to save and use the shaft.
Thanks
 
Just use a screw and washer as suggested, however be careful with the heat. Not too much you can cause the shaft to splinter. I do this almost everyday doing club repairs.
 
Personally? I wouldn't take the chance with graphite. There is so much risk in twisting and ruining the end of the shaft, even if it's only a tiny bit.

Sure it might work out - but encouraging it goes against everything I've ever heard about pulling shafts haha
 
Gents, thanks. I don't expect it to be a frequent endeavor, and I'll probably tip that shaft slightly after.

I am hoping that constant pulling will minimize the amount of needed heat and thus eliminate the possibility of damage.

I've learned over the years from when I did club work, wish I still had the shaft puller, but I could not justify keeping it And not using it.
 
Personally? I wouldn't take the chance with graphite. There is so much risk in twisting and ruining the end of the shaft, even if it's only a tiny bit.

Sure it might work out - but encouraging it goes against everything I've ever heard about pulling shafts haha
This is so true, I would rather use a shaft puller.
 
I've done this more times than I can count and have never damaged a shaft. I've done it in a parking lot clamped to the back of my truck. Clamp it hard in the rubber vice somewhere towards the middle so you don't get a lot of wiggle. Since you've done other club work, after applying heat, you'll know when it's ready to pull. Vice grips and a straight pull, it's done.

Disclaimer would be if you've never done club work or it seems complicated enough that you're terrified, you're probably not qualified. Lol
 
I wanted to follow up.

I believe things went off without a hitch. I did tip the shaft about 3/8" after as the was a crack in the paint above the prep area. I did not see any issue in the uber that area. So when the tips arrive I'll build and test.
 

Attachments

  • 34E9B01C-F5DF-4596-B0A8-D51954807DFD.jpeg
    34E9B01C-F5DF-4596-B0A8-D51954807DFD.jpeg
    107.7 KB · Views: 28
  • B4583420-6BB5-409B-80E0-7A39E27872FB.jpeg
    B4583420-6BB5-409B-80E0-7A39E27872FB.jpeg
    122.8 KB · Views: 27
  • DE705674-FF16-452A-83F7-A843A2C3106A.jpeg
    DE705674-FF16-452A-83F7-A843A2C3106A.jpeg
    109.6 KB · Views: 32
  • A4A44B1F-3412-478E-B7EC-17348B5AA273.jpeg
    A4A44B1F-3412-478E-B7EC-17348B5AA273.jpeg
    69.7 KB · Views: 30
  • D3F90646-C2B0-4A24-915C-7A9FE5BEB1AF.jpeg
    D3F90646-C2B0-4A24-915C-7A9FE5BEB1AF.jpeg
    126.2 KB · Views: 31
  • 69BA521A-32E6-4BFA-A9CB-7ECE19F80D1C.jpeg
    69BA521A-32E6-4BFA-A9CB-7ECE19F80D1C.jpeg
    54.2 KB · Views: 31
I wanted to follow up.

I believe things went off without a hitch. I did tip the shaft about 3/8" after as the was a crack in the paint above the prep area. I did not see any issue in the uber that area. So when the tips arrive I'll build and test.
'A crack in the paint' has me curious. How long was the adapter copper colored before you pulled?
 
Thanks for taking time to reply. I can't give a specific answer, I tell you what I recall.

Most of the discoloration seemed to occur after the tip was removed - almost as a reaction to having more surface area (with the tip now open). It did start to discolor maybe 20 seconds before it was pulled, then it was rapid - hope that makes some sense.

I did a very close post pull inspection and saw the crack - as I noted and tried to capture in the last (?) photo, it was in the paint. I removed that portion to examine the shaft and see if there was any other damage (or whatever I might see). I could only see that paint issue. So trimmed enough tip (less that 1/2 inch) to get the new 'prep' area to fit inside the new tip. It's smooth to the touch (clean of paint and epoxy) and I cannot see any visual issues. If there was/is concern about removing too much of that layer - it's a nice (not loose) fit in the new tip as well.

Hope this helps - I can take an additional photo of the clean area if that helps but - to my eye and feel I cannot see any issues that penetrate into the remaining shaft. I removed paint about 1/8 inch past the crack - to see if it might run up the shaft.

Thanks again for taking the time.
 
Discoloration occurs from close contact with the heat source (torch), it’s just cosmetic. Once the finish reaches a certain point it will turn.
 
Discoloration occurs from close contact with the heat source (torch), it’s just cosmetic. Once the finish reaches a certain point it will turn.

This is correct.
It is important to note that a number of shaft experts have told us that the heat point to break down resin could be much lower than the heat needed to make a pull such as this, so it isn't something I would do or recommend.
 
Oh, I am not worried about the old tip - no longer have that club. I think oldandstiff is wondering if I applied too much heat and thus damaged (cracked) the shaft. I don't think I did. That said - I think I get your point - in that the heat might change the color but not affect the shaft (is that correct)?

Maybe it'll all not matter - if I win the next shaft up (haha). I really like that you are gifting/contesting your old driver.
 
This is correct.
It is important to note that a number of shaft experts have told us that the heat point to break down resin could be much lower than the heat needed to make a pull such as this, so it isn't something I would do or recommend.
Would I see the damage (might I see the damage)? I agree - I would not recommend it either - but I can say that removing the tip compared to removing iron heads from graphite shafts - I do know what a damaged shaft tip looks like (you don't want to know why/how I know this - but ruined about 5 Aldila ByYou proto iron shafts several years ago the tips kind of deform, expand become brittle - crumbly - strands separate - it was a mess. But they did make for great plant stakes.

As it stand, none of that stuff happened in this removal op. I can say the entire thing from clamping the shaft to removal - maybe 2 minutes? Tack on another minute to tip the shaft and prep the new/cleaned area.
 
Oooh, that's a lot of heat to discolor that from black plastic to brown isn't it? I wouldn't know, I've never seen that done before. I never youtubed it because I never needed to.

So did you cut the tip past the crack in the paint or did you sand the paint off and look for damage underneath?

And a general question... how far from the tip can you cut the shaft and still be able to use a standard adapter? (Before the shaft has increased in diameter due to the taper)
 
I removed enough tip so that the newly prepped section (where the crack was) would be inside the new tip. Most of the discoloration occurred after the tip was removed. It was much more subtle (to me/from memory) while still attached. In fact looking back, I am not sure I remember the color changing at all (while still attached). It was when I went back to take the photo that i noticed it.

I also note that that the tip being aluminum it would change color more quickly than say steel (I make that statement as an assumption). I have removed iron heads with just gloves and heat, a shaft puller, etc, both steel and graphite shafts as well. The damage from the heat to the graphite was very obvious. Not so this time (beyond that crack).

I was able to chip off the paint around the crack then scrape the other sides of the shaft (for prep) followed by light sanding to make it uniform. Wish I could explain it better.
 
Back
Top