- Admin
- #2,801
We've launched the new forums! Read more here
Navigation
Install the app
How to install the app on iOS
Follow along with the video below to see how to install our site as a web app on your home screen.

Note: This feature currently requires accessing the site using the built-in Safari browser.
More options
You are using an out of date browser. It may not display this or other websites correctly.
You should upgrade or use an alternative browser.
You should upgrade or use an alternative browser.
The Home Renovation Thread
You are using an out of date browser. It may not display this or other websites correctly.
You should upgrade or use an alternative browser.
You should upgrade or use an alternative browser.
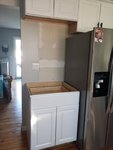
Cabinets (in-stock  ) I ordered a month ago may be in this week. Just a trio of cabinets for the laundry room. Any advice on hanging them?
BIG MULTIQUOTE!!!!
We did IKEA cabinets in our laundry room. They were very easy to hang over a window using a rail system. Secured the rail level, and the clips on the cabinets just hung on there so easily.
We had to get heat to one of our bathrooms last spring. We got it quoted, but since I was furloughed, I did it myself and saved a couple thousand! Thanks covid!Maybe that's something that needs to be tracked... home improvements done because of the corona virus.
Seconded. This is a lifesaver.Buy the little plastic guide to lineup holes if they are not the same...I cannot recommend this enough haha.
Cabinets (in-stock) I ordered a month ago may be in this week. Just a trio of cabinets for the laundry room. Any advice on hanging them?
We did IKEA cabinets in our laundry room. They were very easy to hang over a window using a rail system. Secured the rail level, and the clips on the cabinets just hung on there so easily.
That looks fantastic. Is it going to stay natural, or will you paint/stain?
Are we talking wall cabinets or base or both?Cabinets (in-stock) I ordered a month ago may be in this week. Just a trio of cabinets for the laundry room. Any advice on hanging them?
If wall cabinets, remove the doors to lighten the load, I like to mount a cleat to the wall or at least a level line on the wall where the bottom of the cabinet will sit (cleat preferred as you can just set the cabinet onto of the level cleat. Mark the stud locations in advance (make sure you can see them or know the measurements to the studs). Have plenty of shims, clamps and an extra set of hands is always useful to hold things in place.
Always screw the face frames together... be sure to use clamps to hold tight and pre-drill holes and use a countersink drill bit to ensure screws are flush... good luck
Just some hanging cabinets (two 18w/36h with a 12h/30w in the middle) to replace a sad looking wire shelf. Will have plenty of hands, stools, clamps, and shims at the ready!Are we talking wall cabinets or base or both?
If wall cabinets, remove the doors to lighten the load, I like to mount a cleat to the wall or at least a level line on the wall where the bottom of the cabinet will sit (cleat preferred as you can just set the cabinet onto of the level cleat. Mark the stud locations in advance (make sure you can see them or know the measurements to the studs). Have plenty of shims, clamps and an extra set of hands is always useful to hold things in place.
Always screw the face frames together... be sure to use clamps to hold tight and pre-drill holes and use a countersink drill bit to ensure screws are flush... good luck
- Joined
- Mar 17, 2018
- Messages
- 20,099
- Reaction score
- 28,342
- Handicap
- 18.0
I don't see any TV wiring here. Common, you know you need plenty of TVs hooked up outside to watch.
Looks great
- Admin
- #2,808
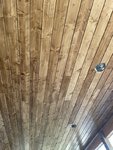
That looks fantastic. Is it going to stay natural, or will you paint/stain?
It is stained and protected. Chose a very light natural color due to u wanted.
I don't see any TV wiring here. Common, you know you need plenty of TVs hooked up outside to watch.
Looks great
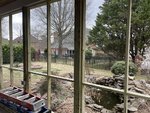
There is plenty of electrical should we decide. Probably will, although with blinds open there is an 85” 10 feet away haha.
It’s getting all of our outdoor kitchen stuff as well as our patio sectional and fire pit table. Pretty excited.
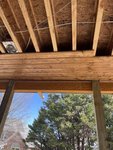
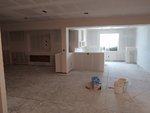
We had a huge issue come up with the roofing. Because of the way the flat roof ties into our existing roof the roofer said if we did the metal roof we were originally planning to do that he is fairly confident we would have a leak at some point, so he recommended we go with a TPO instead.
We were not happy about this, but found out if we did a TPO we could alway have shingles glued on over it to match the house if the HOA has an issue, but since the roof is so high up (it's 11 feet from the floor to the ceiling on the inside) no one will ever really see it unless someone form a 2nd story around us looks at an angle. Roofer said TPO should keep us 100% dry and will actually help keep the space cooler, so we decided to go that route. The roof is being finished right, electrical was done yesterday, and we just picked out the stain color for the ceiling.
After a week delay because of the winter storm, it's nice to see things happening again.
What kind of warranty are they giving you on that TPO membrane? It will eventually succumb to UV and oxygen attack. Shingles would actually help to protect the TPO. But the single membrane is the best answer for a "flat" roof."
- Admin
- #2,810
It’s a solid warranty. But based on my learning it can be very durable like a lot of other materials, which is why RVs have switched to this type of material.What kind of warranty are they giving you on that TPO membrane? It will eventually succumb to UV and oxygen attack. Shingles would actually help to protect the TPO. But the single membrane is the best answer for a "flat" roof."
I would think you’ll get 20-25 years easily.It’s a solid warranty. But based on my learning it can be very durable like a lot of other materials, which is why RVs have switched to this type of material.
- Admin
- #2,812
That’s my guess. And I won’t be here that long hahah.I would think you’ll get 20-25 years easily.
- Admin
- #2,813
- Admin
- #2,814
- Joined
- Mar 17, 2018
- Messages
- 20,099
- Reaction score
- 28,342
- Handicap
- 18.0
Bathroom demolition starts tomorrow, and I bet my wife is the only crazy one that says we have to clean the bathroom the day before. There too much dust she said. 
Bathroom demolition starts tomorrow, and I bet my wife is the only crazy one that says we have to clean the bathroom the day before. There too much dust she said.
Oh no she's not, and if you have a dishwasher, I'll bet I know what happens before the dirty dishes get loaded.
I'm pretty sure your wife and I could be best friends lol I feel like I know herBathroom demolition starts tomorrow, and I bet my wife is the only crazy one that says we have to clean the bathroom the day before. There too much dust she said.
Home Depot never reordered my damaged cabinets. Ordered 2/8, still no cabinets.
So...
It started out several months ago. My deck was 10 years old. The deck boards were soft in a couple of spots... I replaced them (with the wrong boards) and after a mishap or two pressure washing it, it was time to replace the boards.
Day 1
Head to Lowe's after checking prices on line... 5/4x6"x12'... I needed 56. They had 30. The rest were firewood essentially.
Head to Home Depot and get 26 more... after having them pull a pallet of boards off the shelf.
Organize the boards in my yard (lean some of them in a corner and keeping the rest flat) while I strip off the boards.
Get to 1/4 of the boards removed... find joist #1 I need to replace.
Take off more boards.
Notice 3 more joists are hurting.
Replace joist #1.
Sister joists #2 and #3.
Replace joist #4.
Install some deck boards.
Lay more down to cover gaps so dogs can go outside.
Done for day. Tired.
Day 2
Continue installing deck boards.
Notice some hand rail 2x4's are soft. Make note to replace. Still going to get to that.
Tired. Sore. Done for the day. Can't remember it really. It's run together.
Day 3
Finish up installing the deck boards.
Move to replace my deck step treads. 6 of them. Notice stringer #1 is rotted. Needs replacing.
Tear the rest of the treads off. Notice stringer #2 is bad.
Go to Lowe's for stringers.
Get 3 stringers, and 3 joist hangers, and 3 treads.
Remove stringers and don't destroy the handrails or handrail posts.
Notice 1 handrail post is... rotted. Break it off in frustration. Argh!
Go into shed and find 4x4 post to replace the one I broke...
Start to dig out old post. Buried in concrete.
Find edges of concrete. Dig with hand trowel. It barely wiggles.
Dig more.
Break out ratchet strap. Connect to deck post. Ratchet away. Tight tension on strap... post moves slightly.
Go get 16# demolition bar. I'm not playing nice anymore.
Stab ground repeatedly with bar and work it below the concrete.
Shove old deck board with nails still in it under demo bar to give it more leverage in dirt.
Concrete moves.
Adjust ratchet strap to pull from top of deck.
Tighten strap. Not TOO dangerous but not too safe.
Lever demo bar underneath again with deck board underneath.
Deck board crumbles, concrete comes out. I roll it out of the hole.
Grab post hole digger and make hole deeper for replacement post.
Set post. I may have or may not have used concrete. Don't judge me. It's a good 2 1/2 feet into the ground. Dirt is packed tightly around it. It's level and plumb.
Find that stringers are too small. Make them work anyway. Steps turn out better than previous steps. More natural rise, steps are level, and safe.
Lessons learned - It's nice having the power tools to take care of this project.
Star drive screws suck. They go in mostly in the first try; they don't like to come out.
A 21 oz framing hammer can solve a lot of problems.
If the 21 oz framing hammer doesn't solve the problem, reach for the 3# hammer.
Or the sawzall.
A sawzall is a nice thing to have.
I like my Metabo skilsaw.
I love my Kobalt dual bevel sliding compound mitre saw.
Knee pads. Good ones are a must!!!
Tools are great. Putting them away isn't.
I still have more to do.
I'm tired.
I'm sore.
Acetaminophen helps some.
Beer would help more if I drank.
I ran out of daylight.
My wife is happy
I've got more skills doing this crap than I thought I did.
I feel your pain. My strip and restain the deck project last summer turned into a re-stain the deck and rebuild 4 benches project. Ugh.So...
It started out several months ago. My deck was 10 years old. The deck boards were soft in a couple of spots... I replaced them (with the wrong boards) and after a mishap or two pressure washing it, it was time to replace the boards.
Day 1
Head to Lowe's after checking prices on line... 5/4x6"x12'... I needed 56. They had 30. The rest were firewood essentially.
Head to Home Depot and get 26 more... after having them pull a pallet of boards off the shelf.
Organize the boards in my yard (lean some of them in a corner and keeping the rest flat) while I strip off the boards.
Get to 1/4 of the boards removed... find joist #1 I need to replace.
Take off more boards.
Notice 3 more joists are hurting.
Replace joist #1.
Sister joists #2 and #3.
Replace joist #4.
Install some deck boards.
Lay more down to cover gaps so dogs can go outside.
Done for day. Tired.
Day 2
Continue installing deck boards.
Notice some hand rail 2x4's are soft. Make note to replace. Still going to get to that.
Tired. Sore. Done for the day. Can't remember it really. It's run together.
Day 3
Finish up installing the deck boards.
Move to replace my deck step treads. 6 of them. Notice stringer #1 is rotted. Needs replacing.
Tear the rest of the treads off. Notice stringer #2 is bad.
Go to Lowe's for stringers.
Get 3 stringers, and 3 joist hangers, and 3 treads.
Remove stringers and don't destroy the handrails or handrail posts.
Notice 1 handrail post is... rotted. Break it off in frustration. Argh!
Go into shed and find 4x4 post to replace the one I broke...
Start to dig out old post. Buried in concrete.
Find edges of concrete. Dig with hand trowel. It barely wiggles.
Dig more.
Break out ratchet strap. Connect to deck post. Ratchet away. Tight tension on strap... post moves slightly.
Go get 16# demolition bar. I'm not playing nice anymore.
Stab ground repeatedly with bar and work it below the concrete.
Shove old deck board with nails still in it under demo bar to give it more leverage in dirt.
Concrete moves.
Adjust ratchet strap to pull from top of deck.
Tighten strap. Not TOO dangerous but not too safe.
Lever demo bar underneath again with deck board underneath.
Deck board crumbles, concrete comes out. I roll it out of the hole.
Grab post hole digger and make hole deeper for replacement post.
Set post. I may have or may not have used concrete. Don't judge me. It's a good 2 1/2 feet into the ground. Dirt is packed tightly around it. It's level and plumb.
Find that stringers are too small. Make them work anyway. Steps turn out better than previous steps. More natural rise, steps are level, and safe.
Lessons learned - It's nice having the power tools to take care of this project.
Star drive screws suck. They go in mostly in the first try; they don't like to come out.
A 21 oz framing hammer can solve a lot of problems.
If the 21 oz framing hammer doesn't solve the problem, reach for the 3# hammer.
Or the sawzall.
A sawzall is a nice thing to have.
I like my Metabo skilsaw.
I love my Kobalt dual bevel sliding compound mitre saw.
Knee pads. Good ones are a must!!!
Tools are great. Putting them away isn't.
I still have more to do.
I'm tired.
I'm sore.
Acetaminophen helps some.
Beer would help more if I drank.
I ran out of daylight.
My wife is happy
I've got more skills doing this crap than I thought I did.
Most important lesson: do it right or do it twice! Better to fix those joists, stringers and posts now or all your hard work replacing the boards needs to be redone sooner.So...
It started out several months ago. My deck was 10 years old. The deck boards were soft in a couple of spots... I replaced them (with the wrong boards) and after a mishap or two pressure washing it, it was time to replace the boards.
Day 1
Head to Lowe's after checking prices on line... 5/4x6"x12'... I needed 56. They had 30. The rest were firewood essentially.
Head to Home Depot and get 26 more... after having them pull a pallet of boards off the shelf.
Organize the boards in my yard (lean some of them in a corner and keeping the rest flat) while I strip off the boards.
Get to 1/4 of the boards removed... find joist #1 I need to replace.
Take off more boards.
Notice 3 more joists are hurting.
Replace joist #1.
Sister joists #2 and #3.
Replace joist #4.
Install some deck boards.
Lay more down to cover gaps so dogs can go outside.
Done for day. Tired.
Day 2
Continue installing deck boards.
Notice some hand rail 2x4's are soft. Make note to replace. Still going to get to that.
Tired. Sore. Done for the day. Can't remember it really. It's run together.
Day 3
Finish up installing the deck boards.
Move to replace my deck step treads. 6 of them. Notice stringer #1 is rotted. Needs replacing.
Tear the rest of the treads off. Notice stringer #2 is bad.
Go to Lowe's for stringers.
Get 3 stringers, and 3 joist hangers, and 3 treads.
Remove stringers and don't destroy the handrails or handrail posts.
Notice 1 handrail post is... rotted. Break it off in frustration. Argh!
Go into shed and find 4x4 post to replace the one I broke...
Start to dig out old post. Buried in concrete.
Find edges of concrete. Dig with hand trowel. It barely wiggles.
Dig more.
Break out ratchet strap. Connect to deck post. Ratchet away. Tight tension on strap... post moves slightly.
Go get 16# demolition bar. I'm not playing nice anymore.
Stab ground repeatedly with bar and work it below the concrete.
Shove old deck board with nails still in it under demo bar to give it more leverage in dirt.
Concrete moves.
Adjust ratchet strap to pull from top of deck.
Tighten strap. Not TOO dangerous but not too safe.
Lever demo bar underneath again with deck board underneath.
Deck board crumbles, concrete comes out. I roll it out of the hole.
Grab post hole digger and make hole deeper for replacement post.
Set post. I may have or may not have used concrete. Don't judge me. It's a good 2 1/2 feet into the ground. Dirt is packed tightly around it. It's level and plumb.
Find that stringers are too small. Make them work anyway. Steps turn out better than previous steps. More natural rise, steps are level, and safe.
Lessons learned - It's nice having the power tools to take care of this project.
Star drive screws suck. They go in mostly in the first try; they don't like to come out.
A 21 oz framing hammer can solve a lot of problems.
If the 21 oz framing hammer doesn't solve the problem, reach for the 3# hammer.
Or the sawzall.
A sawzall is a nice thing to have.
I like my Metabo skilsaw.
I love my Kobalt dual bevel sliding compound mitre saw.
Knee pads. Good ones are a must!!!
Tools are great. Putting them away isn't.
I still have more to do.
I'm tired.
I'm sore.
Acetaminophen helps some.
Beer would help more if I drank.
I ran out of daylight.
My wife is happy
I've got more skills doing this crap than I thought I did.
- Staff
- #2,824
Spring break and the Doc taking a week off means...renovations apparently. 
We are attacking the living room. 1980’s wood paneling is going, and 1980’s green carpet. Half wall knocked out to make big cased opening to the kitchen. Scraping evil popcorn ceilings. Then texture, and paint.
Yay?
We are attacking the living room. 1980’s wood paneling is going, and 1980’s green carpet. Half wall knocked out to make big cased opening to the kitchen. Scraping evil popcorn ceilings. Then texture, and paint.
Yay?
Or how we have to clean the house BEFORE the cleaning lady comesOh no she's not, and if you have a dishwasher, I'll bet I know what happens before the dirty dishes get loaded.


