- Joined
- Nov 27, 2016
- Messages
- 3,619
- Reaction score
- 2,198
- Location
- The Land of Steady Habits
- Handicap
- 13.4 GHIN
Or maybe...... ummmmm never mindls wood working a pseudonym for drawing and fading the ball ?
Follow along with the video below to see how to install our site as a web app on your home screen.

Note: This feature currently requires accessing the site using the built-in Safari browser.
Or maybe...... ummmmm never mindls wood working a pseudonym for drawing and fading the ball ?
lam in mechanical engineering, some how living in a Period style home , a lot of what gets done is complimentary wood construct. We fully renovated home 4 years ago .So little needs doing but seldom out of odd jobs to do )Or maybe...... ummmmm never mind
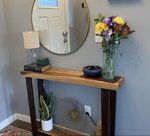
Sorry, showing my lack of info here, but It says this: "Ultra Pure White Extra Durable Satin Enamel Interior Paint & Primer. " But when I look into it, it almost seems like it is a latex. Which I know an enamel would be better correct?Latex?
Yes an acrylic or alkyd would be preferable. Latex tends to be more flexible when dry. For your table I would look for an alkyd based semi-gloss. It’ll cure as tough as the poly without the extra work.Sorry, showing my lack of info here, but It says this: "Ultra Pure White Extra Durable Satin Enamel Interior Paint & Primer. " But when I look into it, it almost seems like it is a latex. Which I know an enamel would be better correct?
Yes, I had some twist develop in both the case and the stand. My plan to deal with it will be to attach the case to the stand permanently (probably with screws) and shorten whichever legs are the pivot. I did a trial where I clamped the pieces together and I think it’ll work. The drawers in the stand should require only minimal fitment to slide smoothly. Then I won’t have to worry about attaching the waist molding to only the stand


It looks like your mistake was being the glass being too narrow along the short sides of the box, is that right?View attachment 9007237
Built this to for my mom's mothers day gift. Threw it together fairly quickly and planned on replacing the back with a 1/4 Black walnut so that it matches the rest of the frame. It was my first time doing a shadow box and I really enjoyed it. Had a few errors that I had to figure out how to fix. Anyone with experience know how to figure out the overall cuts while factoring in the groove. Before having to recut the sides (while it was glued together) I had not factored that in. I'm interested in trying to sell these if I can figure out how to properly measure them so that I can get the right sizes to people who order them. Below is an image of the issue I had.
View attachment 9007238
Wood movement tends to be less problematic in modern, climate controlled houses. Also, most shrinkage tends to occur across the grain of a board. Yes there are other dimensions in which wood movement occurs, but across the grain is the biggie. My father has a cabinet with 2 cherry slab doors in his kitchen. In the summer the doors close snugly together but in winter there is a 3/8”-1/2” gap that opens between them. He uses electric heat and it gets very dry during the winter months, even with running a humidifier.I have tried so hard to understand wood movement and simply don't get it. I mean I understand it, but have been lucky enough that it has not been an issue for me. I built this table very early in my woodworking hobby and had no idea about wood movement. The top is all mitered edges, the legs are mitered at the bottom, the table sits next to the front door of the house, and I have had no issues. This is not to brag but to say I am very lucky. The wood had a low moisture content and maybe where I live in Oregon has such gradual humidity changes that nothing is drastic enough to be noticeable??
That walnut desk you build looks great. I have not tried to build anything nearly that advanced.
So my process was I basically measured the glass and left a bit over my 45 because I knew I was cutting the groove into it. after I cut them, dry fit, I went to the table saw and raised my blade on the table saw to about 1/4" then ran the rails and stiles. Glued up the three sides and dropped the glass in just to have the surprise of the gap in my photo. From there I got lucky in that my 12" miter saw missed the opposite stile when I went to 45 cut about 1/2" off each stile. Once I cut it, I dropped the glass in and ironically this time it was too big, so I just took the unglued piece, ran it down the table saw with the blade raised a bit more and it worked. My issue is just needing to find the exact process so that I can make what a customer asks for. I have my golf ball displays that have worked well in the past, I think what I keep having issues with is just the groove depth.It looks like your mistake was being the glass being too narrow along the short sides of the box, is that right?
Anyway, when figuring panel sizes, say for a frame and panel door, I do the following:
1. Find the final outside dimensions of the door (e.g. 24” tall by 18” wide)
2. Determine the width of the pieces that will make the frame (rails and stiles) let’s say 2” wide for this example.
3. The inside dimension (reveal for the panel) will be each dimension - 4” (2 rails/stiles at 2” each), 20” x 14” in our example.
4. Determine the groove depth to be used (let’s say 1/2” for nice round numbers).
5. Add 2 * groove depth (1/2” in our example) to each dimension for the panel size. In our case our panel would need to be 21” x 15”
Now, typically there is some gap left in the grooves with wooden panels so that they may “float”, that is expand and contract with seasonal changes in humidity. A good rule of thumb is to leave 1/8” gap for wood movement. Using glass you can leave much less gap, but still leave a little for “fudge factor”.

Definitely easier to make a mistake working back from the panel size but it looks like it worked out in the end.So my process was I basically measured the glass and left a bit over my 45 because I knew I was cutting the groove into it. after I cut them, dry fit, I went to the table saw and raised my blade on the table saw to about 1/4" then ran the rails and stiles. Glued up the three sides and dropped the glass in just to have the surprise of the gap in my photo. From there I got lucky in that my 12" miter saw missed the opposite stile when I went to 45 cut about 1/2" off each stile. Once I cut it, I dropped the glass in and ironically this time it was too big, so I just took the unglued piece, ran it down the table saw with the blade raised a bit more and it worked. My issue is just needing to find the exact process so that I can make what a customer asks for. I have my golf ball displays that have worked well in the past, I think what I keep having issues with is just the groove depth.
View attachment 9007260

It’s not very buoyant either. Not a good choice for a life raftPicked up some Ipe for the handrail. It was wild to me just how heavy Ipe is.

It’s not very buoyant either. Not a good choice for a life raft
Be sure to pre drill everything. Buy a new bit and expect to relegate it to beater status after the job is done.

bought a new bit for the router with that in mind. Finished it last night and put some danish oil on it. Any suggestions on anything else to protect it. Utah weather is a bit odd but I just don’t want my parents having to replace or refinish it yearly.
I used the old railing as drying racks View attachment 9014866

IPE is naturally weather resistant, so any finishes will be more for looks than anything else. In the battle of wood finishes vs. the sun, the sun wins every time. You’ll need regular upkeep of any exterior wood finish. Some will look good longer than others, but all will eventually fail.
IPE is naturally weather resistant, so any finishes will be more for looks than anything else. In the battle of wood finishes vs. the sun, the sun wins every time. You’ll need regular upkeep of any exterior wood finish. Some will look good longer than others, but all will eventually fail.
But like what is the Phil Mickleson (wood finish) to the TigerIPE is naturally weather resistant, so any finishes will be more for looks than anything else. In the battle of wood finishes vs. the sun, the sun wins every time. You’ll need regular upkeep of any exterior wood finish. Some will look good longer than others, but all will eventually fail.
So possibly just wiping it down with some Ipe oil every so often should work?this is 100% accurate. I actually own a small company that sells ipe garden furniture and have tried just about every finish I can.
What makes ipe such a great hardwood for outdoors is also what makes finishing more difficult. The wood itself is so dense that penetrating oils really only go so deep and any sort of film finish ultimately fails.
My favorite product to use is actually called “ipe oil”. I personally prefer the finish it provides and feel it lasts just a bit longer. As @JohnSinVA said, the sun will always win so it ultimately depends on how harsh the environment is
if your not a fan of the silver look, just try to keep up with cleaning and re-oiling prior to losing all its color. Once you do you can restore it but it takes some elbow grease.
I clean with simply a mild detergent and scrub with a stiff bristle brush. If necessary I lightly hit with 80 grit before applying oil. If you pressure wash, just hit it with some sandpaper to knock off the “fuzz”.
I’m certainly not claiming to be an expert on finishes. My wife lives the new ipe look so I stay on the adirondacks in my yard. I do cover them when not in use so I’m only finishing about once a year…

Yes, you will want to clean it as if not, the dirt will get pushed into the wood and it will create black spots. Generally, if there is some color left you can hit it with soap and a brush and re-oil. Just give it about a day to dry out. It’s really not as painful as it sounds if you don’t let it goBut like what is the Phil Mickleson (wood finish) to the Tiger
So possibly just wiping it down with some Ipe oil every so often should work?
So possibly just wiping it down with some Ipe oil every so often should work?
Since this is what you would do.... I have a little raised deck I did a couple years back using ipe.... needs a refresh.... I'll pressure wash it and have it ready for your to apply the oil....This is what I would go with.

Since this is what you would do.... I have a little raised deck I did a couple years back using ipe.... needs a refresh.... I'll pressure wash it and have it ready for your to apply the oil....
Will let her know….Sand it first. Have the missus do that part.