EBannermanS
Member
So I have admittedly not been active on this forum for a few months now, but felt that I owed it to the community to create this post since my inspiration for building a backyard putting green came from another member here - Misike. He was even helpful after the post in that we exchanged private messages a couple times to discuss a few particulars. I'm posting this so that others that may be interested in doing the same can reference or reach out for any help. I certainly learned a lot along the way. First and foremost, it was harder than I expected it to be. ") I'm a pretty handy guy, and this was no simple task. I'll try to go step-by-step and add pictures where I can. If anyone has questions, please don't hesitate to ask. And thanks again to Misike for the inspiration and help! Enjoy!
I'm a pretty handy guy, and this was no simple task. I'll try to go step-by-step and add pictures where I can. If anyone has questions, please don't hesitate to ask. And thanks again to Misike for the inspiration and help! Enjoy!
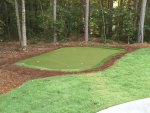
1. I was getting my backyard graded and re-sodded, so I decided it was the right time to clear some area in the corner of the yard that I could dedicate to building my putting green. The cleared area is in the middle of the below picture, and it backs up the woods behind my house.


2. I used a rope to decide the general shape that I wanted my putting green to have, and then I started to dig out about a 6" hole by hand with a shovel. This was a MUCH larger lift than I was expecting going into it. I imagine that the Georgia red clay had something to do with it... The previous homeowner used to use this area as a garden bed, so there were also tons of roots in the dirt that had to be removed, as well. This process took me a couple of weeks since I couldn't do it all at once.


3. Once I had my hole dug to the size and depth I liked, I put down some weed block fabric on the bottom of the hole and begun to move by shovel & wheelbarrow 6 cubic yards of "crusher run". That equates to roughly 16,000 lbs of rock and sand. The delivery arrived around 3:30p and by 8:45p I had moved it all into the hole. I rented a plate compactor from Home Depot ($80 per 24 hours) to compact all of the base layer. My parents live about an hour away from me, and my dad called me that evening to check in on the progress. As you can imagine, I was complaining about how sore I felt from the day's work, so he offered to come help the following morning. I wasn't going to ask my 67 year-old father to do manual labor, but I certainly wasn't going to turn him down if he was offering.


4. The next morning, I had 3 cubic yards of "M10" or granite sand delivered to the house, which would make up the top layer of the surface. The area that I had cleared for the green was about 22 ft. x 18 ft. On the long side, I had about 8" of slope and the short side had about 4" of slope. I certainly wanted some undulation and slope in the green for a number of reasons (including drainage), but I definitely wanted to make it less severe. Therefore, we had to add more material towards the back left part of the green in order to bring it closer to level. We raked the M10 as smooth as we possibly could before bringing the compactor back in. We wanted to find any little hills/valleys/inconsistencies so that it would be as clean of a roll that we could get. After spraying it down pretty good with water, my dad compacted the top layer.


I'll continue this in the next post...
I'm a pretty handy guy, and this was no simple task. I'll try to go step-by-step and add pictures where I can. If anyone has questions, please don't hesitate to ask. And thanks again to Misike for the inspiration and help! Enjoy!1. I was getting my backyard graded and re-sodded, so I decided it was the right time to clear some area in the corner of the yard that I could dedicate to building my putting green. The cleared area is in the middle of the below picture, and it backs up the woods behind my house.
2. I used a rope to decide the general shape that I wanted my putting green to have, and then I started to dig out about a 6" hole by hand with a shovel. This was a MUCH larger lift than I was expecting going into it. I imagine that the Georgia red clay had something to do with it... The previous homeowner used to use this area as a garden bed, so there were also tons of roots in the dirt that had to be removed, as well. This process took me a couple of weeks since I couldn't do it all at once.
3. Once I had my hole dug to the size and depth I liked, I put down some weed block fabric on the bottom of the hole and begun to move by shovel & wheelbarrow 6 cubic yards of "crusher run". That equates to roughly 16,000 lbs of rock and sand. The delivery arrived around 3:30p and by 8:45p I had moved it all into the hole. I rented a plate compactor from Home Depot ($80 per 24 hours) to compact all of the base layer. My parents live about an hour away from me, and my dad called me that evening to check in on the progress. As you can imagine, I was complaining about how sore I felt from the day's work, so he offered to come help the following morning. I wasn't going to ask my 67 year-old father to do manual labor, but I certainly wasn't going to turn him down if he was offering.
4. The next morning, I had 3 cubic yards of "M10" or granite sand delivered to the house, which would make up the top layer of the surface. The area that I had cleared for the green was about 22 ft. x 18 ft. On the long side, I had about 8" of slope and the short side had about 4" of slope. I certainly wanted some undulation and slope in the green for a number of reasons (including drainage), but I definitely wanted to make it less severe. Therefore, we had to add more material towards the back left part of the green in order to bring it closer to level. We raked the M10 as smooth as we possibly could before bringing the compactor back in. We wanted to find any little hills/valleys/inconsistencies so that it would be as clean of a roll that we could get. After spraying it down pretty good with water, my dad compacted the top layer.
I'll continue this in the next post...