Golf Pride’s new Concept Helix system is here to revolutionize the way you change grips. And Golf Pride’s new installation system is as much about how it works as it is about what it lets you do. Go ahead – forget everything you knew about changing your grips and if you didn’t know anything, no problem.
Golf Pride has been known for developing great new products and compounds and giving golfers exceptional grip options, but there has always been one messy, universal process of installing grips on your clubs. Honestly, I never put a single thought into this process because it has just always been done this way my entire golfing life. You buy a grip, install the grip (or pay someone to install it), and you wait until it is dry. The old process added time and cost to a grip change but Concept Helix changes everything. While I never gave it a second thought, we can all be happy that plenty of people gave it plenty of thought. Now, with Concept Helix, you can change any grip anywhere – in the golf course parking lot, in your garage, or even sitting on the couch – without ever using chemicals or a breaking a sweat. If you haven’t picked up on it yet, Concept Helix is truly disruptive technology (and great for golfers too).
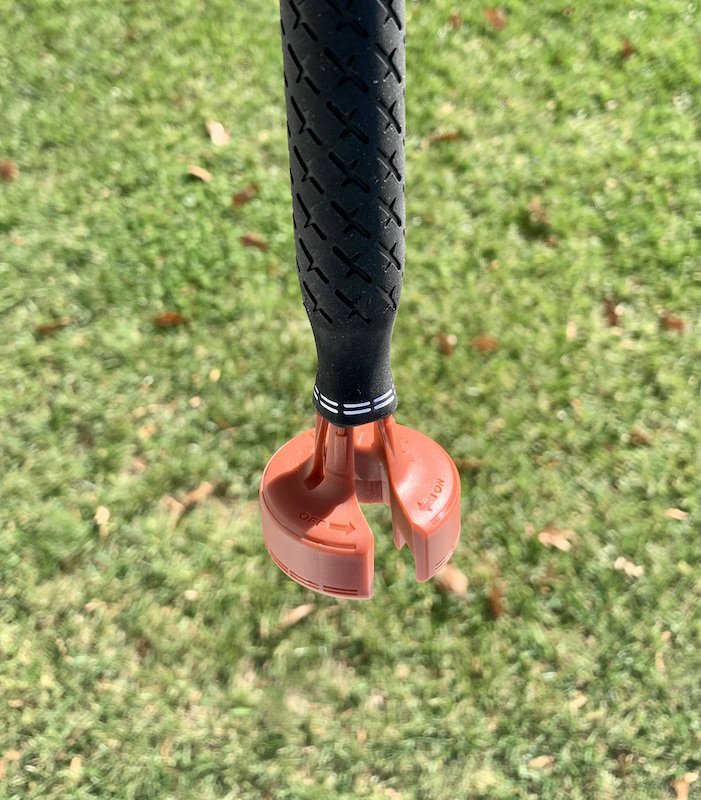
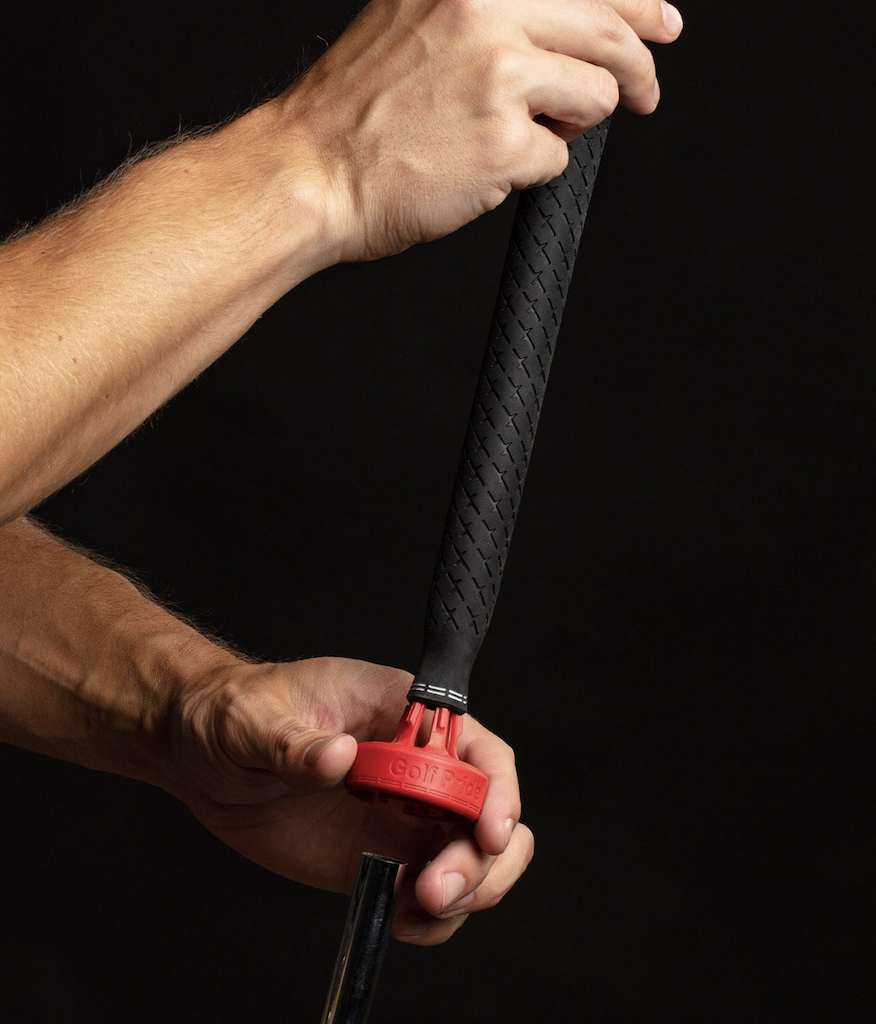
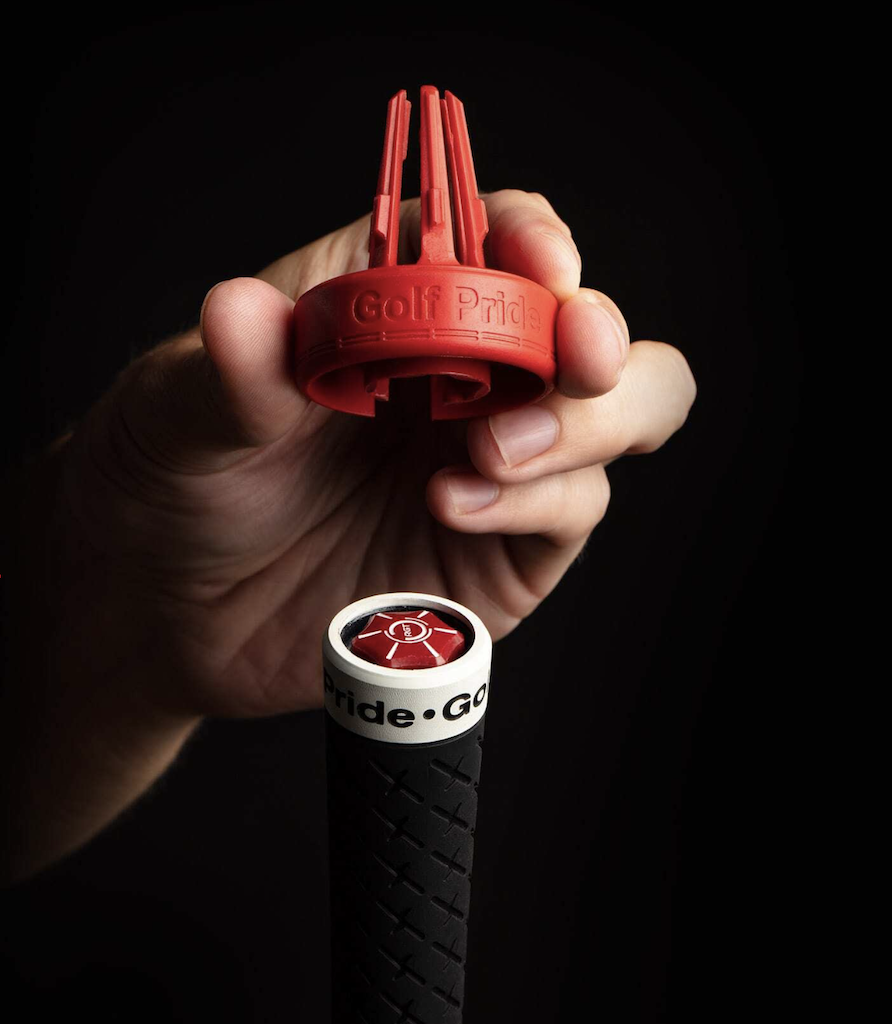
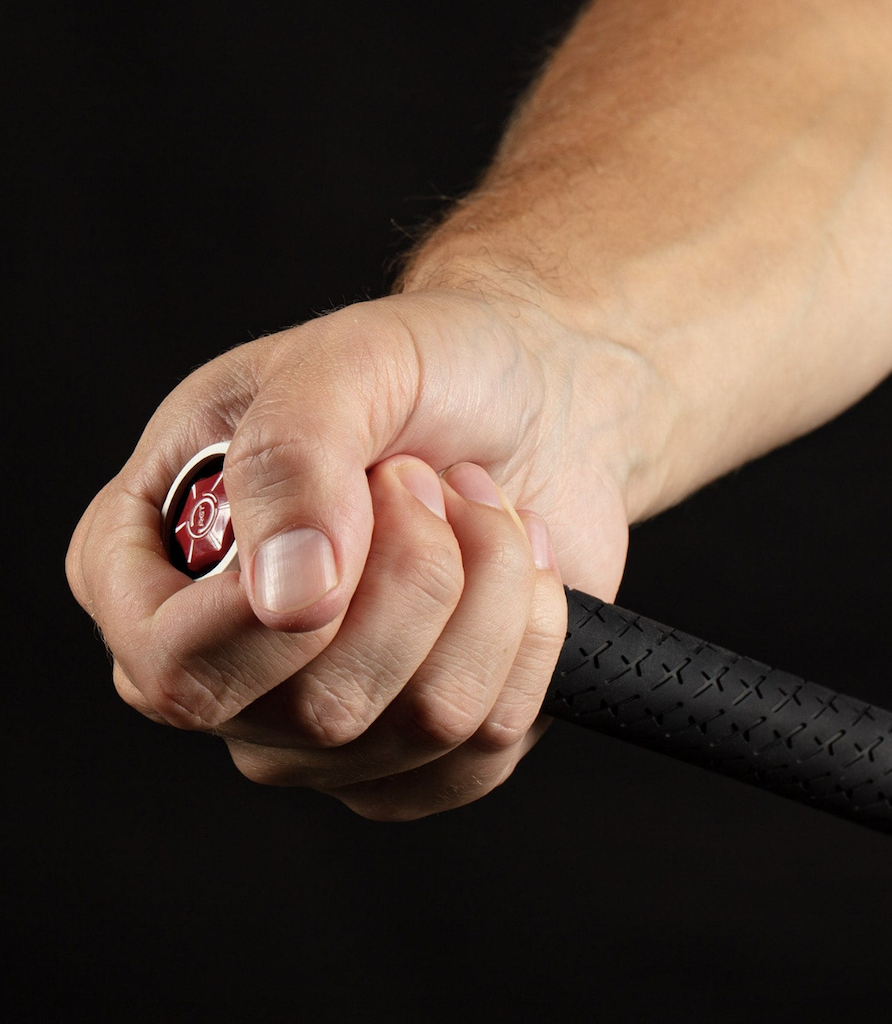
So, what is Golf Pride’s new ground breaking technology? Concept Helix is a new installation system that lets you change a grip in minutes and take it right to the course using a friction and torque-based installation that doesn’t require vices, solvents, or adhesives – just a specific “horn” device and some twisting by hand. Say goodbye to the added installation cost, materials, and waiting time after changing grips… if it works. I don’t want to spoil the ending, but it works, and really, really well. Let’s jump into the process:
Concept Helix system is marketed as super easy to use and is designed to let anyone change a grip regardless of your familiarity with the old process, how handy you are, or what materials you have in your garage. Although Golf Pride has a video series that explains the process in great detail, the process of installing a Concept Helix grip is: (1) remove the old grip (if present), (2) remove old tape and substances (if present), (3) insert the horn into the mouth of the grip and slip the grip on the shaft, (4) use the horn to twist and tighten the end cap, and (5) hand twist the grip and end cap until tight. Seriously – that’s it!
But to really prove this point, it is important to get this into the hands of someone who has little to no experience changing grips and see how it goes. And that’s where my confession comes – I have never changed a grip in my life and I have none of the traditional tools and materials needed to change them at home. In short, I was the perfect test subject to show just how revolutionary the system is and how easy Concept Helix grips are to install.
Eight minutes. Seriously, eight minutes was all it took to go from a worn Golf Pride Tour Velvet 360 grip on my utility iron to swinging a new Concept Helix grip, and the only thing I used was a pocket knife. In fact, the actual installation process of the Concept Helix grip couldn’t have taken more than a minute or two and the old grip removal took the reminder of the time. I’m happy to report that the Concept Helix grip stayed perfectly secured during my range session immediately after changing the grip.
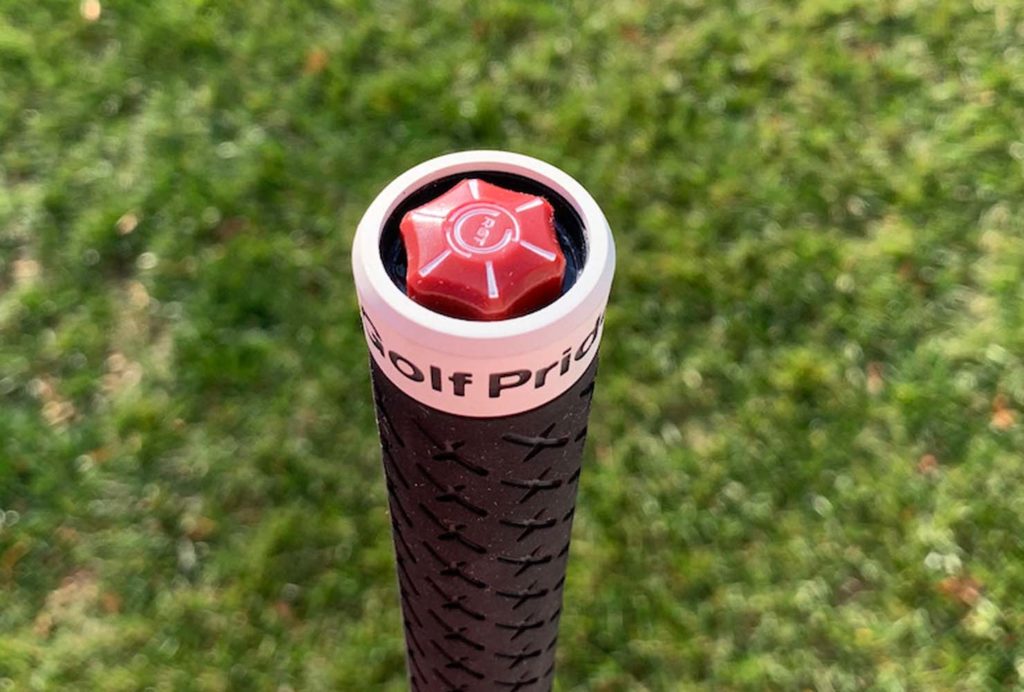
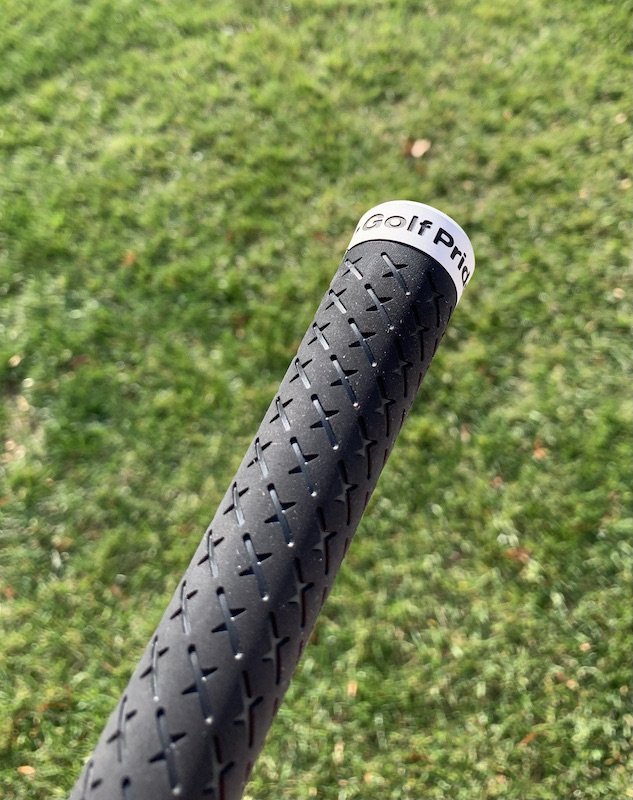
As you might expect, the Concept Helix grips are designed a bit different than ordinary grips to work in the revolutionary system. Despite being different, they were purposefully designed to feel similar to Golf Pride’s ever popular Tour Velvet grips. The proprietary grip formula is currently all rubber (sorry cord and Align lovers) and has a textured pattern to maximize grip. No word on the possibility of other textures, compounds, or options but if I was to make a prediction, it would be that the future of golf grips is bright and the sky is the limit for Golf Pride’s Concept Helix.
The installation of golf grips may never be the same now and it has opened the door to self-installation of grips to any golfer in their own home and at a moment’s notice without any messy installation. You can learn more about Concept Helix by visiting www.concepthelix.com.
With grip weight it’s 5g = 1 SW point.
My driver is a D0 and after installing this grip it was a C7.
2g = 1 sw point is for head weight not for grip weight.
General rule of thumb:
1/2" = 3 swing weight points
2 gr club head weight = 1 swing weight point
5 gr grip = 1 swing weight point
9 gr shaft weight differences = 1 swing weight point
4* flatter lie or more up right lie = increase or decrease 1 swing weight point
I didn’t have any problem with the Concept Helix sticking. They slid on and off just fine. They went onto TM RBZ and TM Burner 2.0 clubs so the tape was several years old. I removed the tape prior to installing the grips.
Wildly disruptive innovation. And that video alone got me hyped. I’m a huge Tour Velvet fan so these might be the perfect fit. I changed my own grips for the first time recently and it was a decent amount of work. This would save me tons of time.
I’m interested in the concept
Having installed 3 of the Helix I’d argue I could install 3 conventional grips quicker and I don’t blow my grips on either.
the gain would be on the 2nd install of the helix as you wouldn’t need to fool around with Tape removal and retaping.
I agree with a big gain being on the 2nd install. Would take little time.
Yes, that makes sense. The tape removal is certainly the most difficult and time consuming part.
Conceptually I think it’s brilliant. In real world use, I’d prefer to have fewer turns and a fox for the bunching issues. Outside of that, I think the idea is innovative and innovation in golf is something I love.
exactly.
Solid info, I am a little wary of dropping my swing weights so much.
Valid concern
this is a big thing for me. i live in a decent sized city with lots of option for club work. the problem is, the city is spread out with tons of traffic. the closest place i can go is 15-20 minutes away, but it’s a big box store and sorry but i don’t trust them. so i go to a smaller retailer who i trust. he’s 25 minutes away (used to be 40 minutes away), so it’s an hour round trip, 2 trips (drop off and pick up). he’s not open on the weekends, and he’s busy so it’s usually a few days before i have my clubs back.
i also live in a smaller house, with nowhere to have a workshop. i have no sink big enough to work in. and i’m not what you might call handy.
this system is so good for someone like i am. the only reason i haven’t bought a full set yet is no arccos. i would prefer cord but i can live without. not having arccos might be a dealbreaker though.
appreciate the candid thoughts. i’m the guy who takes 4 hours to install a ceiling fan that should take less than an hour, and even i installed these grips with ease. but the twisting was something i noted in my feedback to gp that i thought was a problem. dealing with tennis elbow right now, it did not feel good to do that much torque with my forearms.
Heat Gun makes tape removal a snap. Almost falls off with some heat.
What do you need a sink for when changing grips ?
i assume solvent. i removed the old grip take with something like goo gone and made a damn mess outside. would never do again. not to mention i wanted to punch a wall i was so frustrated trying to get the tape off.
Tape is the absolute devil.
i read a lot about how to do it. thought i had the right stuff. adhesive remover. heat. even used oil per another suggestion. still did an absolute sh1t job of it and never want to do it again.
No need for solvent to remove old tape. About 30 seconds with a heat gun or perhaps longer with a hair drier and the tape peels right off.
As for solvent and new grips I just throw a towel down And let it drip on there. Solvent eventually dries up. Or I’ll let it drip onto a paper towel and then pitch it.
I’ve gone the hair dryer route with mixed results.
Done deal. Thanks!
It’s like riding a bike friend. We all look pretty stupid at first and have a ton of errors. Then one day it clicks and you’re like OH, that’s not that hard at all. If I can do it, you can certainly do it.
makes sense. i can’t really ride a bike either.
The hardest part of being part of this was not talking about it!
This right here. Too many turns and then the twisting afterward is a bit much I think. There has to be a way they can reduce that I would think.
I agree with you if you need to do a full set. I didn’t mind the turns with only two clubs. It I could see not being able to do 13 clubs in one sitting without losing feeling in your arms.
Haha yeah, wasn’t it like 30 half turns or something to start and then the twist? Just seemed like a lot.
Exactly. Felt like I was doing an arms cardio vid. "Okay, we’re going to start with 30 half turns. Ready? Here we go and crank it!"
In all seriousness, a full bag would problematic and that all by itself would be a deterrent. The guys at Edwin Watts reshafted my bag in all of 25mins and they saved the old grips.
You do give off that dog in shoes kinda feel
There’s absolutely no requirement that one do an entire set of clubs at one time – I think that’s a red herring. Yeah? It’s a bit of a workout. But the convenience of not having to drop my clubs off, pay someone to do it, or have to get special gear to do them myself the traditional way are attractive selling points imho.
I think they’ll fine tune the product (or a competitor will develop easier systems) and it’ll just get easier with time.
I think the option to do them at home without equipment is an attractive selling point, but I still think it’s a trade off. If I choose not to do them all at one time then I’m still exchanging time for convenience. I can walk into my local golf store and get them installed while I wait for roughly $3 a club. Alternatively, I can do the installs at home, but maybe not in one session or not even in one day. If the point is to provide the agility to alternate grips on demand, then installation time and effort has to be a factor. I think they’ll get it right. As a matter of fact, for several users it didn’t seem to be an issue.
View attachment 8977479View attachment 8977480
Nope never messed with them and don’t intend to start. Take it to Golf USA in Manhattan or to a small shop guy I know and am good with spending the few $’s they charge me. They will check the lofts and lies while doing it.
I started doing grips when my 4 kids started playing and I built clubs for them and a friend or two or three asked…Then stopped…Now I have 10 gran kids and several are starting to play and Gramps is the go to for all things golf. Personally I’m a ribbed lover so the twist on never gonna be an option for me.
I still am impressed with the concept. I love how out there this is and how it’s trying to fill a need that may not exist yet.
Im sure this is a later design than what was originally proposed and has gone through the iterative process before getting into our hands.
I think this is cool, but I think there needs to be something else to make this killer.
It solves the “I need it now” need. No mess, no wait for the solvent to dry and the tape to grab again. A minute or so of work and it’s done and ready for play, much like air installation. The difference there though is this doesn’t move around, nor compromise the integrity of the grip with air pressure.
I was trying to talk through the steps and show everyone. You can do one grip in a minute once you get good at it.