We've launched the new forums! Read more here
Navigation
Install the app
How to install the app on iOS
Follow along with the video below to see how to install our site as a web app on your home screen.

Note: This feature currently requires accessing the site using the built-in Safari browser.
More options
You are using an out of date browser. It may not display this or other websites correctly.
You should upgrade or use an alternative browser.
You should upgrade or use an alternative browser.
Custom paint on my putter
You are using an out of date browser. It may not display this or other websites correctly.
You should upgrade or use an alternative browser.
You should upgrade or use an alternative browser.
Great way to make it yours! I really dig the black and white look
Nice paint job!
I agree. I think that looks much better. Nice job.
Well done!
SlightDraw
Well-known member
Looks clean. Well done
Looks really solid! I've wanted to paint mine for a while but never knew how. What kind of paint did you use? Would you mind sharing any techniques or useful tips?
I love the customization of stuff and I'm stuck at home so I figured, why not try this!
I love the customization of stuff and I'm stuck at home so I figured, why not try this!
- Joined
- Sep 26, 2013
- Messages
- 14,140
- Reaction score
- 11,863
- Location
- Usually on an airplane
- Handicap
- 2 Children
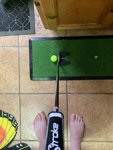
Looks good from here, but do us all a favor. If you're going to take a photo like the last one, paint your toe nails too!
Nice job. Can I send you my C300 DRIVER HEAD TO GO MAT BLACK!!
WOW good job. A write up and what type of stuff you used like suggested would be nice too.
The crossbar at the top is a really nice touch. Well done.
Very nice job!
- Joined
- Mar 17, 2018
- Messages
- 20,129
- Reaction score
- 28,360
- Handicap
- 18.0
Well done. Love the look
shadow0861
World's Okayest Golfer
- Thread starter
- #15
Looks really solid! I've wanted to paint mine for a while but never knew how. What kind of paint did you use? Would you mind sharing any techniques or useful tips?
I love the customization of stuff and I'm stuck at home so I figured, why not try this!
Testors model paint. Matte white. Taped the area for the front perpendicular line with painters tape. All the paint fill was filled with paint and then wiped with a paper towel soaked in either paint thinner or mineral spirits. It was actually quite easy.
Sent from my iPhone using Tapatalk
shadow0861
World's Okayest Golfer
- Thread starter
- #16
Nice job. Can I send you my C300 DRIVER HEAD TO GO MAT BLACK!!
Yeah...I can’t spray paint worth a damn. I just am good at detail and paint fill.
Sent from my iPhone using Tapatalk
shadow0861
World's Okayest Golfer
- Thread starter
- #17
Looks really solid! I've wanted to paint mine for a while but never knew how. What kind of paint did you use? Would you mind sharing any techniques or useful tips?
I love the customization of stuff and I'm stuck at home so I figured, why not try this!
I will write on here later today with my methods. On this thread. I am thinking of offering doing the paint fill and detail stuff to people.
Sent from my iPhone using Tapatalk
shadow0861
World's Okayest Golfer
- Thread starter
- #18
WOW good job. A write up and what type of stuff you used like suggested would be nice too.
I will comment on this thread later with a write up of how I did it.
Sent from my iPhone using Tapatalk
shadow0861
World's Okayest Golfer
- Thread starter
- #19
So, to start this off...I actually did the painting about a month ago. I ended up reshafting it because the stock shaft started rusting after less than a year. After I reshafted it, I put a new SuperStroke grip on, and decided it was a good time to take pictures. I did the shaft replacement and regripping myself. I love a little club tinkering. Anyway, down to business: how did I re-paint it?
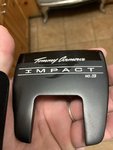
First, the existing paint fill. You can either scrape it out or paint over it. On the putter, I decided to paint over the existing paint. The only exception was the putter face. I bought little scrapers at Harbor Freight. Search their site for “pick set” and you will find tools similar to dental tools that are perfect for scraping paint out. It comes out really easily. I would link to the tools I bought but I don’t know how this forum is on external links.
To fill the cavities with paint, I use a safety pin tip, dip it in whatever color paint I am using. And slowly apply the paint in the cavity one drop at a time. It sounds silly, but due to physics, MOST of the paint will get sucked into the cavities and not make a mess. It doesn’t take as long as you think to do it this way, the cavities fill up relatively quick.
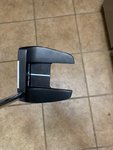
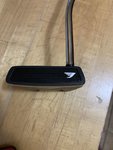
The perpendicular line on the top of the putter was more difficult, as there was no indentation or cavity to fill. I measured 1/4 inch from the face in two places and used that to line up my tape in a straight line. I then used the two “fangs,” the two thick pieces of metal sticking out the back, as guides to put tape on each end of my line I was making.

I recreated my tape here so you can see what it looked like. Do yourself a favor and tape the face level with the area you’re painting like so:

Remember how I said earlier that the paint gets sucked into cavities? Well I learned the hard way that the face milling counts as cavities, and the grooves sucked up the paint like a straw. Not fun to have to fix. Use your thumb to really mash the face tape into the grooves to prevent paint run. I used a small model paint brush to put two coats of white paint on the top line.
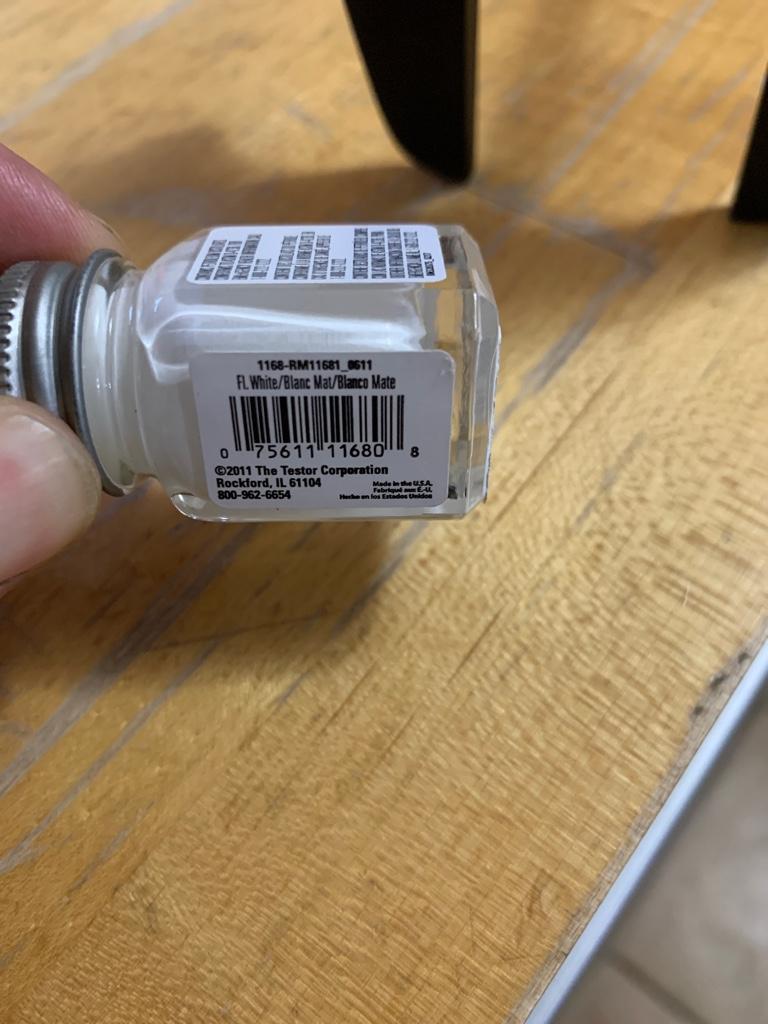
That is the paint that I used on this and other clubs, like my old wedges. I prefer matte to gloss, and I like working with Testors enamel paint because it is runny, easy to clean up with thinner, and strong when dry.
When I watched other videos of people doing it, they use acrylic paints, and if you want to I am sure they work great too. I am just using what I am comfortable with and have used a lot before.
As far as paint fill, I have never had any come out, including the lofts on the soles of wedges, so I just kept using the paint I have used. But keep in mind: the line on top of the putter is not paint fill, it is just paint on top. Use a head over to protect your hard work. This is the one I bought to match my color theme:

The only thing I would have changed is the shaft color. I couldn’t find a double bend putter shaft that was black. So I just bought a True Temper shaft, and dream about a blacked out one.
I hope you like this, and I hope it helps at least one person make their putter more personal than when they bought it. Have fun!
Sent from my iPhone using Tapatalk
First, the existing paint fill. You can either scrape it out or paint over it. On the putter, I decided to paint over the existing paint. The only exception was the putter face. I bought little scrapers at Harbor Freight. Search their site for “pick set” and you will find tools similar to dental tools that are perfect for scraping paint out. It comes out really easily. I would link to the tools I bought but I don’t know how this forum is on external links.
To fill the cavities with paint, I use a safety pin tip, dip it in whatever color paint I am using. And slowly apply the paint in the cavity one drop at a time. It sounds silly, but due to physics, MOST of the paint will get sucked into the cavities and not make a mess. It doesn’t take as long as you think to do it this way, the cavities fill up relatively quick.
The perpendicular line on the top of the putter was more difficult, as there was no indentation or cavity to fill. I measured 1/4 inch from the face in two places and used that to line up my tape in a straight line. I then used the two “fangs,” the two thick pieces of metal sticking out the back, as guides to put tape on each end of my line I was making.

I recreated my tape here so you can see what it looked like. Do yourself a favor and tape the face level with the area you’re painting like so:

Remember how I said earlier that the paint gets sucked into cavities? Well I learned the hard way that the face milling counts as cavities, and the grooves sucked up the paint like a straw. Not fun to have to fix. Use your thumb to really mash the face tape into the grooves to prevent paint run. I used a small model paint brush to put two coats of white paint on the top line.

That is the paint that I used on this and other clubs, like my old wedges. I prefer matte to gloss, and I like working with Testors enamel paint because it is runny, easy to clean up with thinner, and strong when dry.
When I watched other videos of people doing it, they use acrylic paints, and if you want to I am sure they work great too. I am just using what I am comfortable with and have used a lot before.
As far as paint fill, I have never had any come out, including the lofts on the soles of wedges, so I just kept using the paint I have used. But keep in mind: the line on top of the putter is not paint fill, it is just paint on top. Use a head over to protect your hard work. This is the one I bought to match my color theme:

The only thing I would have changed is the shaft color. I couldn’t find a double bend putter shaft that was black. So I just bought a True Temper shaft, and dream about a blacked out one.
I hope you like this, and I hope it helps at least one person make their putter more personal than when they bought it. Have fun!
Sent from my iPhone using Tapatalk
Great tutorial, @shadow0861. One question - when cleaning up the excess paint around the fills afterward, how do you avoid the paint thinner running into the fills and ruining them?
Snooksman
Well-known member
- Joined
- Sep 18, 2019
- Messages
- 1,159
- Reaction score
- 1,181
Great job on it. You gave me a great idea to do some custom work on my putter during this time.I bought the Tommy Armour Impact 3 putter based on its performance. But...I HATED the copper color it came with. So I busted out my model paint and went to town. I think it looks nice black and white. I even added a perpendicular line on the top. View attachment 8932657
View attachment 8932658
View attachment 8932659
View attachment 8932660
Sent from my iPhone using Tapatalk
Sent from my SM-N950U using Tapatalk
shadow0861
World's Okayest Golfer
- Thread starter
- #22
Great tutorial, @shadow0861. One question - when cleaning up the excess paint around the fills afterward, how do you avoid the paint thinner running into the fills and ruining them?
So, it’s actually easier than you think. I get a q-tip wet but not soaking, and very quickly wipe it once across the face to get the majority of the excess paint. It can’t ruin the paint fill, thinner will just evaporate and the paint will dry again.
After that evaporates off I take another less wet (with thinner, of course) paper towel or more q-tip to get the rest of the paint smears off the club. Even if you miss some and there is a ghost of white paint somewhere, it comes off with more thinner.
The opposite is true as well. If you get too aggressive with the thinner and wipe paint out of the cavity, well, just let what you have dry and fill in what you emptied. There really is no way to permanently screw up.
Sent from my iPhone using Tapatalk
- Joined
- Apr 23, 2016
- Messages
- 78
- Reaction score
- 67
- Handicap
- 18
Great job, thanks for the masking pics. I used to paint miniatures and build models in my youth, so painting a top line on my putter like yours will be a snap.
this feels like an elevated look now. Great Job! I really like the top down black and white from grip to putter to cover.


