THP Auto Repair Shop

I have a problem I’ll throw out there:

Volvo S80, 2010 V8
In the winter months, when I first start the car I get a whiney sound from the engine that slowly settles as the car warms up. In the summer, there is basically little to no sound. Brought to Volvo and they suspect it is the rack and pinion (spelling?) and told me it would be $7k to fix. No thanks…walked out of there quickly. Local mechanic thinks it could be, may be the power stearing motor or pump.

Any thoughts?

Thank you in advance.

Love the idea of this thread.

Does it make noise without turning the steering wheel or when you turn the wheel?
 
These are the times to repair the suspension. 6.2 for the front, 7.8 for the back. So, labor wise, you should be around $600 for the front. What did they quote the parts for? $1300 worth?
PARTS AND LABOR
Labor
SKILL
WARRANTY
STANDARD
Overhaul/Rebuild
Front Suspension
One Side
B
0.0
3.2
Both Sides
B
0.0
6.2
Rear Suspension
One Side
B
0.0
4.0
Both Sides
B
0.0
7.8
Lubricate
Chassis, Lubricate
C
0.0
0.7
Ok, so the 16 hour estimate wasn't too far off. I am providing all the parts, I bought them already. The $1900 was labor and four wheel alignment.

Sent from my Pixel 2 XL using Tapatalk
 
Awesome resource - thanks!

I have a 2011 Mazda CX-7, and thanks to YouTube, I've been able to replace several items on it that I'd ordinarily have to seek service and high $$$ to do. I changed the fuse, relay, blower motor resistor, and finally, the blower motor itself - all for about $175 in parts.

Lately I've been having issues with the automatic door locks. I found these steps that worked temporarily:

Step-by-Step procedure

1. Remove the key from Ignition Switch, close all doors in your car, open the driver door only and leave it open.
2. Enter the vehicle, insert key into Ignition Switch and switch the “Ignition On” and switch the “Ignition Off” 3 times quickly
(within 5 seconds or faster). Leave the key in the Ignition Switch in “Ignition Off” position.
3. Close and open the drivers door three times.
When done properly, the Central Locking system should automatically lock and then unlock. Now the vehicle is in programming mode.
If locks do not cycle you must start the procedure over.
4. Push the Unlock Button twice on the first Remote to be programmed. The door locks should cycle to indicate successful programming.
If there is only one Remote Control Transmitter to be programmed to vehicle, you must push any button twice again on the same remote, wait for Central Locking to cycle, then push any button twice one more time on the same Remote Control Transmitter.
If there are two remotes to be programmed, then press any button on the second remote twice, wait for Central Locking to cycle, then push any button twice again on the second remote. To program 3 remotes to this vehicle you must press buton twice on second remote, wait for Central Locking to cycle, then press any button twice on the third Remote Control Transmitter.
5. Remove the key from Ignition Switch to exit programming mode.

Through these, I'm fairly confident that the door lock actuator in the driver's front door is bad. I've looked on YouTube and there are vids on replacing that. It involves removing the interior door panel and that I'm afraid to do, but the dealer quoted me $692 for that repair and I can get the part for < $100, so I'm going to go ahead and try it.

My biggest fear is that, if I remove the door panel, I'll never get it back on properly, and/or I'll break some of the plastic clips as the car is 10+ years old.

My question: is it particularly difficult to remove and replace the interior door panel?

Thanks again for this resource!

INNER GARNISH REMOVAL/INSTALLATION

1. Pull the inner garnish outward and detach clips A.


image
Open In New TabZoom/Print


2. Remove the hook B.

3. Remove the inner garnish.

4. Install in the reverse order of removal.
FRONT DOOR TRIM REMOVAL/INSTALLATION

Driver's Side


1. Disconnect the negative battery cable.

2. Remove the inner garnish. See: Front Door Panel > Removal and Replacement > Inner Garnish Removal/Installation

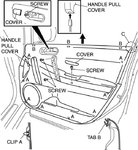
3. Remove the covers, then remove screws.


image
Open In New TabZoom/Print


4. Detach clips A from the door trim using fastener remover.

5. Pull the door trim upward and detach tabs B from the door.

CAUTION:
- Remove the front door trim being careful not to scratch area C of the sash film.

6. Disconnect the power outer mirror switch connector and the power window main switch connector.

7. Disconnect the door lock switch connector.


image
Open In New TabZoom/Print


8. Remove the inner handle cover.

9. Remove the front door trim.

10. Install in the reverse order of removal.

Passenger's Side

1. Disconnect the negative battery cable.

2. Remove the inner garnish. See: Front Door Panel > Removal and Replacement > Inner Garnish Removal/Installation

3. Detach handle pull cover using a tape-wrapped flathead screwdriver as shown in the figure.

4. Remove the covers, then remove screws.


image
Open In New TabZoom/Print


5. Detach clips A from the door trim using fastener remover.

6. Pull the door trim upward and detach tabs B from the door.

CAUTION:
- Remove the front door trim being careful not to scratch area C of the sash film.

7. Disconnect the power window subswitch connector.

8. Disconnect the door lock switch connector.


image
Open In New TabZoom/Print


9. Remove the inner handle cover.

10. Remove the front door trim.

11. Install in the reverse order of removal.

Just take your time and make sure you remove all the screws. The tabs you usually have to give a firm tug to pop the panel loose.
 
Awesome resource - thanks!

I have a 2011 Mazda CX-7, and thanks to YouTube, I've been able to replace several items on it that I'd ordinarily have to seek service and high $$$ to do. I changed the fuse, relay, blower motor resistor, and finally, the blower motor itself - all for about $175 in parts.

Lately I've been having issues with the automatic door locks. I found these steps that worked temporarily:

Step-by-Step procedure

1. Remove the key from Ignition Switch, close all doors in your car, open the driver door only and leave it open.
2. Enter the vehicle, insert key into Ignition Switch and switch the “Ignition On” and switch the “Ignition Off” 3 times quickly
(within 5 seconds or faster). Leave the key in the Ignition Switch in “Ignition Off” position.
3. Close and open the drivers door three times.
When done properly, the Central Locking system should automatically lock and then unlock. Now the vehicle is in programming mode.
If locks do not cycle you must start the procedure over.
4. Push the Unlock Button twice on the first Remote to be programmed. The door locks should cycle to indicate successful programming.
If there is only one Remote Control Transmitter to be programmed to vehicle, you must push any button twice again on the same remote, wait for Central Locking to cycle, then push any button twice one more time on the same Remote Control Transmitter.
If there are two remotes to be programmed, then press any button on the second remote twice, wait for Central Locking to cycle, then push any button twice again on the second remote. To program 3 remotes to this vehicle you must press buton twice on second remote, wait for Central Locking to cycle, then press any button twice on the third Remote Control Transmitter.
5. Remove the key from Ignition Switch to exit programming mode.

Through these, I'm fairly confident that the door lock actuator in the driver's front door is bad. I've looked on YouTube and there are vids on replacing that. It involves removing the interior door panel and that I'm afraid to do, but the dealer quoted me $692 for that repair and I can get the part for < $100, so I'm going to go ahead and try it.

My biggest fear is that, if I remove the door panel, I'll never get it back on properly, and/or I'll break some of the plastic clips as the car is 10+ years old.

My question: is it particularly difficult to remove and replace the interior door panel?

Thanks again for this resource!

door1.jpeg
door3.jpegdoor4.jpeggarnish.jpegdoor2.jpeg
 
@J.B. Cobb III I think you need to add a rule to this thread. Of advice is given, people need to come back and let us know whether it worked. I’m sitting here wondering if @Parrot has a bad sway bar. 😂
 
@J.B. Cobb III I think you need to add a rule to this thread. Of advice is given, people need to come back and let us know whether it worked. I’m sitting here wondering if @Parrot has a bad sway bar. 😂
I responded. When I get it into my mechanic, I’ll provide his diagnosis.
 
Awesome resource - thanks!


My question: is it particularly difficult to remove and replace the interior door panel?

@J.B. Cobb III provided the how to, I'll tell you that pulling the door panels is about the easiest thing you can do. (You replaced the blower motor which would have required removing more than a panel) The clips, IF, you break any can be bought at any parts store. My truck is an 02 and I haven't busted any on mine yet despite pulling the panel untold times for various reasons.
 
Have you tried to update after connecting to your home wifi?
What You'll Learn

You’ll learn how Over-the-Air vehicle software updates work and what you need to do to download the software and complete the installation. You’ll also learn your connectivity options and how to accept or decline an update.
How It Works

The basics

• Your vehicle requires Internet connectivity to download and install vehicle software updates. This can be accessed through the vehicle’s built-in 4G LTE connection1, if equipped. Or you may use a secure Wi-Fi® hotspot, such as a mobile device hotspot, home network or public network. Applicable data rates may apply.
• You must have accepted the connected vehicle User Terms and Conditions and Privacy Statement for your vehicle to be eligible for Over-the-Air vehicle software updates.
• Update notifications will be sent to your vehicle, and you can also manually check for them using the infotainment system2.
• There are two steps to getting the update: software download and installation.
• If you have any questions or concerns about a vehicle software update, you can press your blue OnStar®3 button to contact an Advisor or call 888.4.ONSTAR. You may also contact your dealer for assistance.

Software download
• You can continue to use your vehicle normally during a software download.
• Downloads automatically pause and resume if you turn off your vehicle or lose connectivity (e.g., if you pull into a parking garage).
• Download times will vary, depending on the size of an update and your wireless signal strength (4G LTE connection or external/brought-in network).
• You can check the progress of a vehicle software download in the “Settings” menu in your infotainment system. Look for either of the following (steps may vary by vehicle):
• Under the "System" tab, go to the "Vehicle Software" section and look for "Updates."
• Choose "Software Information" and then look for "System Update."
• In some cases, after a download is complete and an Over-the-Air installation is pending, your radio and audio may stay on for up to five minutes after you exit the vehicle; this is normal.

Software installation
• Once a download is complete, you’ll be prompted to install the update the next time you turn your vehicle on or shift it into PARK. You can also choose to be reminded later, schedule or decline the installation.
• If you choose to decline an update, the update will cancel and you may need to take your vehicle to a dealer if you wish to perform the update at a later time.
• You’ll be asked to put your vehicle in PARK and turn off the engine to initiate most updates.
• While an update is being performed, you can’t drive your vehicle and the infotainment system may remain active for the duration of the update. For this reason, park in a safe and secure location before initiating any update.
• Generally, software installation is expected to take 20 minutes or less.
• You’re not required to stay in your vehicle during an update.
• If you leave your vehicle during an update, close your windows and lock your doors. Don’t lock occupants inside.
• It is normal for your infotainment system to remain active during an update. You may also notice one or more system resets during an installation process.
• If you decide to remain in your vehicle, you can check the progress of a vehicle software installation in the “Settings” menu in your infotainment system. Look for either of the following (steps may vary by vehicle):
• Under the "System" tab, go to the "Vehicle Software" section and look for "Updates."
• Choose "Software Information" and then look for "System Update."


There are NUMEROUS tsbs(technical service bulletins) on the 2016-17 Impala! Many have to do with the infotainment/On-Star systems. I found TSB-17-NA-025 that addresses your concern. My suggestion, try to update the system following the videos I uploaded, make sure you have a strong wi-fi connection. If this doesn't fix the concern, I would disconnect the battery for 30 minutes. Be careful, this will reset the vehicle to factory specs and might lock the infotaiment/radio system. Lastly, if none of these fixes your problem, I would take it to the dealership and have them perform the TSB. It only charges 0.6 hours, so it shouldn't be a big strain on your wallet. OR, keep driving it and ignore it!:LOL:

@J.B. Cobb III I think you need to add a rule to this thread. Of advice is given, people need to come back and let us know whether it worked. I’m sitting here wondering if @Parrot has a bad sway bar. 😂
Okay IT WORKED!!!!!!
I connected the car to my home Wi-Fi Extender in the Garage and change the settings to unload in the background and something must have happened because I don’t get that message anymore.
Thank You @AuzzieMatt and @J.B. Cobb III
 
@J.B. Cobb III i have a question for you…

Do you believe in putting anti-seize on wheel studs/lug nuts? I usually put a tiny bit because there is not much worse than breaking a stud off, especially when you have a flat. But I have been told by others that it will promote loosing. I have never found that to be the case, but o always wonder.

I just put some on my golf cart wheels when I installed the spacers, so I figured I would ask your opinion.

Short answer…no. You shouldn’t lubricate lug studs. The torque values are rated for a clean and dry lug nut/stud. Now, if I have a vehicle that I know will be sitting for a while…garaged classic car, junk car, RV, trailer, etc., I will either take the wheels off or put a little WD-40 on them. But, on a daily driver, I never lubricate them because I usually rotate my tires every 5k-10k miles.


Does Permatex® suggest applying anti-seize to lubricate lug nuts when installing or tightening the nuts?
Posted on: February 18, 2016
Permatex® does not recommend the use of any anti-seize product on wheel studs. Many people have used anti-seize for this applications, however, there is the potential for over-torqueing and therefore, higher clamp loads and potentially dangerous bolt stretch. Because of the lubricity of anti-seize, there is a tendency to over-tighten because of the ease with which the nut will bear down on the lug. For this reason, even if you try to torque the nuts to factory specs, the clamp load may become too high depending on the type of bolt, size and manufacturer.
 
Quick easy fix. Just saw a screw in a tire tread causing leak. Seems like tire places won’t fix tires anymore. What’s best way to DIY?
 
Quick easy fix. Just saw a screw in a tire tread causing leak. Seems like tire places won’t fix tires anymore. What’s best way to DIY?

Watch this video. Plugs are easy to install. I usually patch my tires, but you have to remove the tire from the wheel. If the puncture is in the sidewall, replace the tire.

 
Thanks for this. I have a couple of issues:

2009 Toyota Tacoma

In the morning we wind up with condensation inside the car on the glass. I would imagine there is a bad seal somewhere but how do I find it without replacing seals on all the glass.

There is a ticking noise that seems to come from under the car when under load. When you rev the engine it sounds fine. When accelerating you can hear the ticking noise. If you let off the gas the ticking seems to go away. I think it is there when on the gas at highway speeds but it can be a bit hard to hear. Overall the engine seems to be strong.
 
Quick easy fix. Just saw a screw in a tire tread causing leak. Seems like tire places won’t fix tires anymore. What’s best way to DIY?

If you're a member of Costco or Sam's they'll do it for $15.
 
If you're a member of Costco or Sam's they'll do it for $15.
Around here if the tire has more than 1000 miles on it they say “we can’t fix it ,you need a new tire”!!??
 
This is awesome because I am mechanically challenged!
 
Thanks for this. I have a couple of issues:

2009 Toyota Tacoma

In the morning we wind up with condensation inside the car on the glass. I would imagine there is a bad seal somewhere but how do I find it without replacing seals on all the glass.

There is a ticking noise that seems to come from under the car when under load. When you rev the engine it sounds fine. When accelerating you can hear the ticking noise. If you let off the gas the ticking seems to go away. I think it is there when on the gas at highway speeds but it can be a bit hard to hear. Overall the engine seems to be strong.

I like a smoke machine for this the best. But, if you don’t have one, you can use soapy water or a foaming glass cleaner. Spray the seals and joints around the windows and doors. Then used compressed air while inside the vehicle to blow air on the seals. If the soap bubbles or the foam blows away, you found your leak. Also, is your floorboard wet? It could be a clogged a/c drain.

The tick will be a little harder to pinpoint. How many miles on the engine? Do you change your oil regularly? What oil/filter do you use? Has the vehicle ever had a tune up or fuel filter?

The floorboard doesn’t seem to be wet but I will check.

The truck has about 130,000 miles on it. It gets regular oil changes and service. I am not sure what exact oil is used we tend to get it done at Valvoline. At around 85,000 miles it had a full frame replacement by Toyota because of a frame recall.
 
Around here if the tire has more than 1000 miles on it they say “we can’t fix it ,you need a new tire”!!??

I'd tell them to go braid their 💩
 
I don't have any issues with my vehicle, but I'm wondering if you are able to shed any insight into how the new start/stop technology uses different components/methods from "conventional" engines. I've read that the starter for the start/stop uses a belt, but I have no other information to back that up.

If you know and would explain, great. If not, no sweat.
 
The floorboard doesn’t seem to be wet but I will check.

The truck has about 130,000 miles on it. It gets regular oil changes and service. I am not sure what exact oil is used we tend to get it done at Valvoline. At around 85,000 miles it had a full frame replacement by Toyota because of a frame recall.

Ever had a tune up or fuel filter replaced?
 
Just plugged my tire leak with the Slime tool kit. Ready to work on turbo chargers next haha
 
I don't have any issues with my vehicle, but I'm wondering if you are able to shed any insight into how the new start/stop technology uses different components/methods from "conventional" engines. I've read that the starter for the start/stop uses a belt, but I have no other information to back that up.

If you know and would explain, great. If not, no sweat.

What you are referring to is a BAS- Belted Alternator Starter, which is a type of “mild hybrid”. They basically attach a 48V electric motor to a conventional gas engine. The BAS takes place of the normal alternator and starter.
34A68DE3-C02D-4346-AB09-4A30A041715B.jpeg
A normal gas engine with Start/Stop technology uses a specially designed starter to accomplish this.
 
Back
Top