maxw72
Well-known member
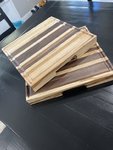
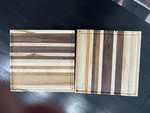
So I built my first cutting board as it was one of those things I just wanted to try. Pretty happy for it being my first one. Long story short my mother in law wanted to use it as a chacuterie board and by chance the lady at the grocery store was a hobbyist woodworker. Something she said is that the board is not ready to have food on it. I had oiled and conditioned the board and to what I saw it looked safe for use. The lady said it still needs to be oiled and conditioned multiple times for the next couple weeks....Anyone have thoughts on this? I bought my boards from a guy who actually mills the wood for cutting boards specifically and they are kiln dried and advertised as basically being ready to be glued and finished. Weeks on end of conditioning and waxing seemed like a bit much. Pictures are from right after it had been oiled.


")